Your App Is Not Available Try Again Later Os X
Build Your First Android App in Kotlin
i. Welcome!
In this codelab, y'all'll acquire how to build and run your beginning Android app in the Kotlin programming linguistic communication. (If yous're looking for the Java version of this codelab, you tin can go hither.) Kotlin is a statically typed programming language that runs on the JVM and is completely interoperable with the Java programming language. Kotlin is an officially supported language for developing Android apps, along with Java.
What you must know already
This codelab is written for programmers and assumes that you know either the Java or Kotlin programming language. If you are an experienced programmer and adept at reading code, you will likely be able to follow this codelab, even if you don't accept much feel with Kotlin.
What you'll larn
- How to use Android Studio to build your app.
- How to run your app on a device or in the emulator.
- How to add interactive buttons.
- How to display a 2d screen when a push button is pressed.
Utilize Android Studio and Kotlin to write Android apps
Y'all write Android apps in Kotlin or in the Java programming language using an IDE called Android Studio. Based on JetBrains' IntelliJ IDEA software, Android Studio is an IDE designed specifically for Android evolution.
To work through this codelab, you lot will need a computer that tin run Android Studio 3.half-dozen or higher (or already has Android Studio 3.6 or college installed).
ii. Install Android Studio
You tin download Android Studio 3.6 from the Android Studio page.
Android Studio provides a complete IDE, including an advanced code editor and app templates. It also contains tools for evolution, debugging, testing, and performance that go far faster and easier to develop apps. You lot can employ Android Studio to exam your apps with a large range of preconfigured emulators, or on your own mobile device. You can also build production apps and publish apps on the Google Play store.
Android Studio is available for computers running Windows or Linux, and for Macs running macOS. The OpenJDK (Java Evolution Kit) is bundled with Android Studio.
The installation is similar for all platforms. Whatsoever differences are noted below.
- Navigate to the Android Studio download page and follow the instructions to download and install Android Studio.
- Accept the default configurations for all steps, and ensure that all components are selected for installation.
- After the install is consummate, the setup wizard downloads and installs additional components, including the Android SDK. Be patient, because this procedure might accept some time, depending on your cyberspace speed.
- When the installation completes, Android Studio starts, and you are set up to create your first project.
3. Job: Create your first project
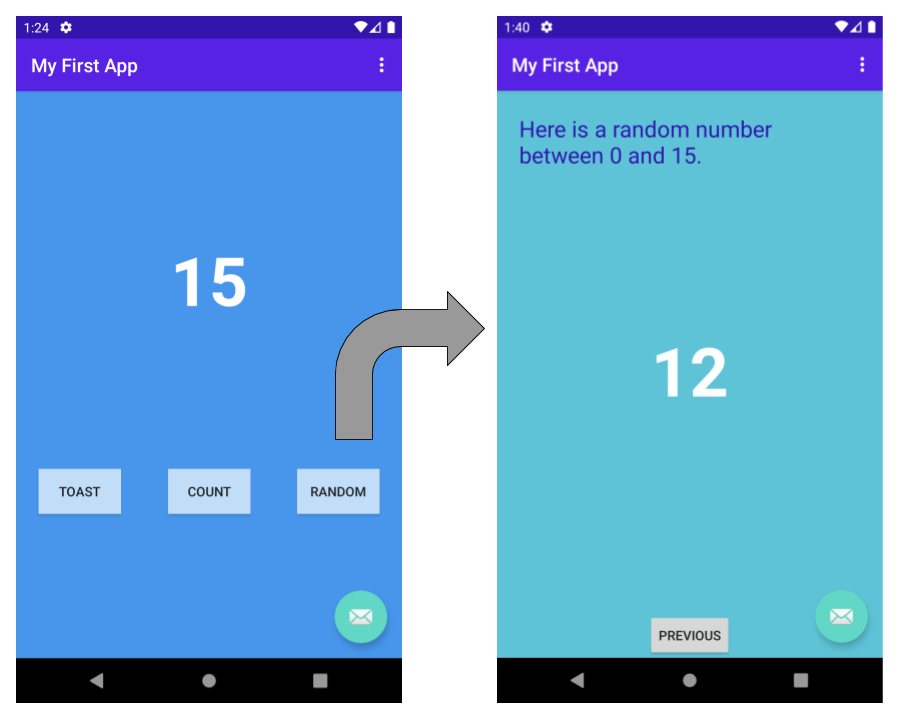
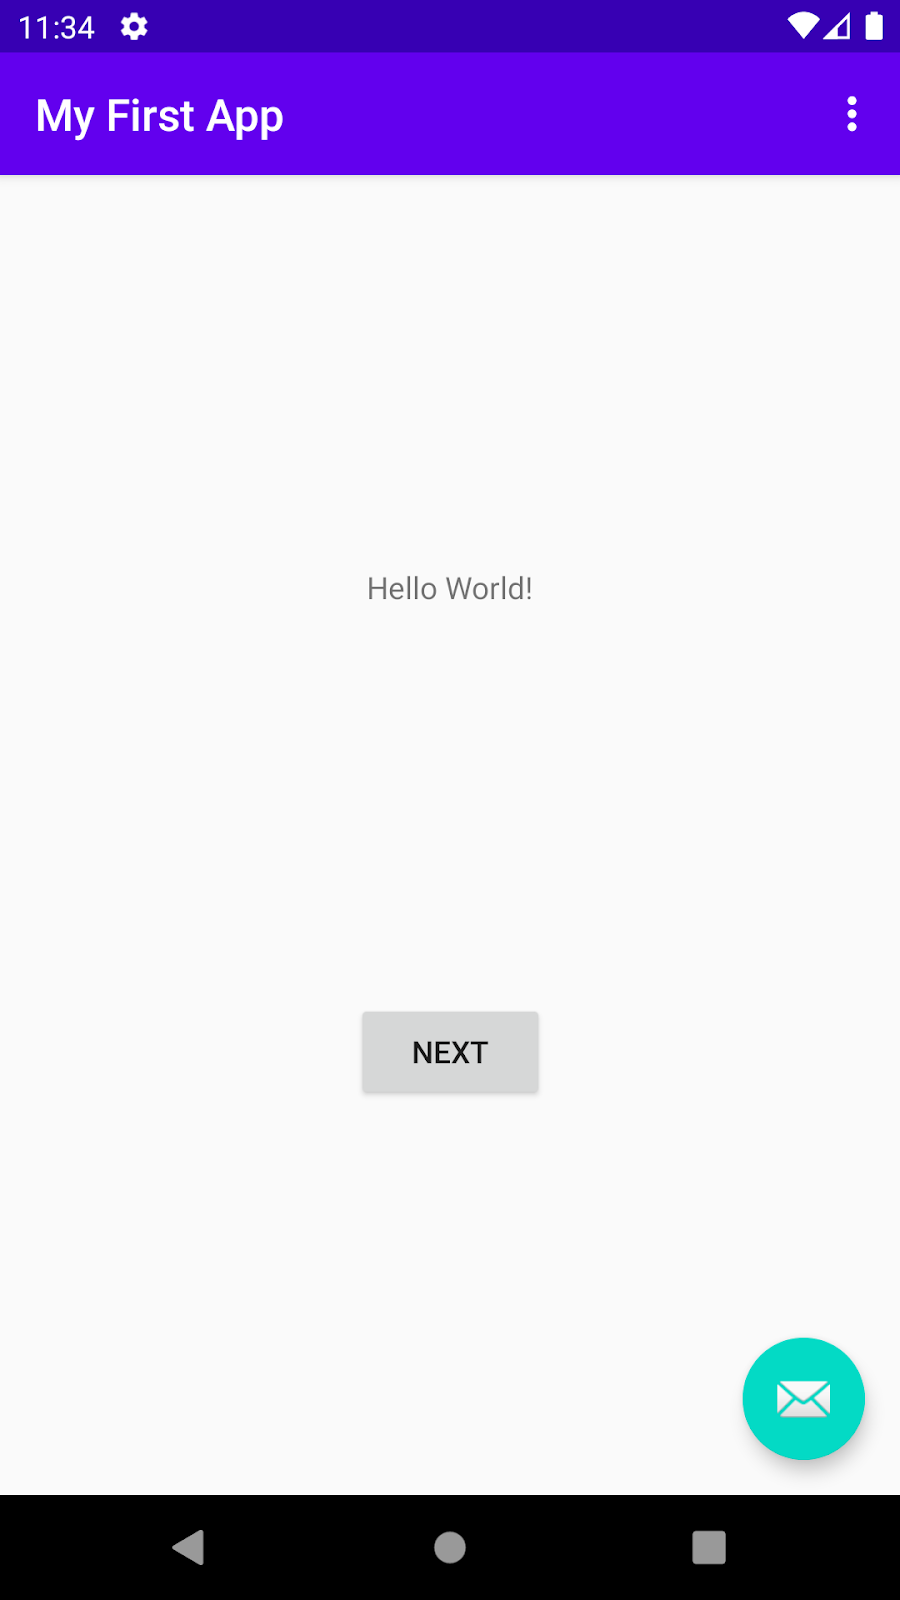
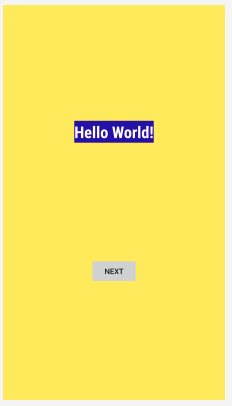
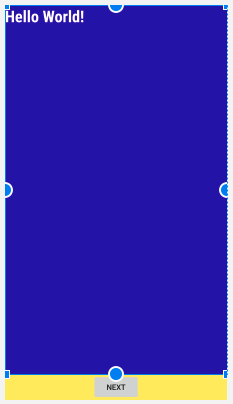
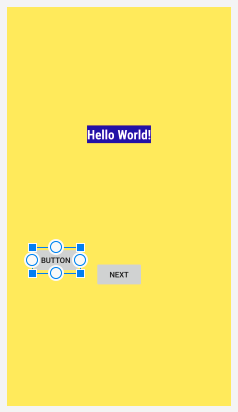
In this pace, you lot volition create a new Android project for your first app. This simple app displays the string "Howdy Earth" on the screen of an Android virtual or concrete device.
Hither's what the finished app will await similar:

What you'll learn
- How to create a project in Android Studio.
- How to create an emulated Android device.
- How to run your app on the emulator.
- How to run your app on your ain physical device, if you have one.
Footstep 1: Create a new project
- Open Android Studio.
- In the Welcome to Android Studio dialog, click Offset a new Android Studio project.

- Select Basic Activity (not the default). Click Next.
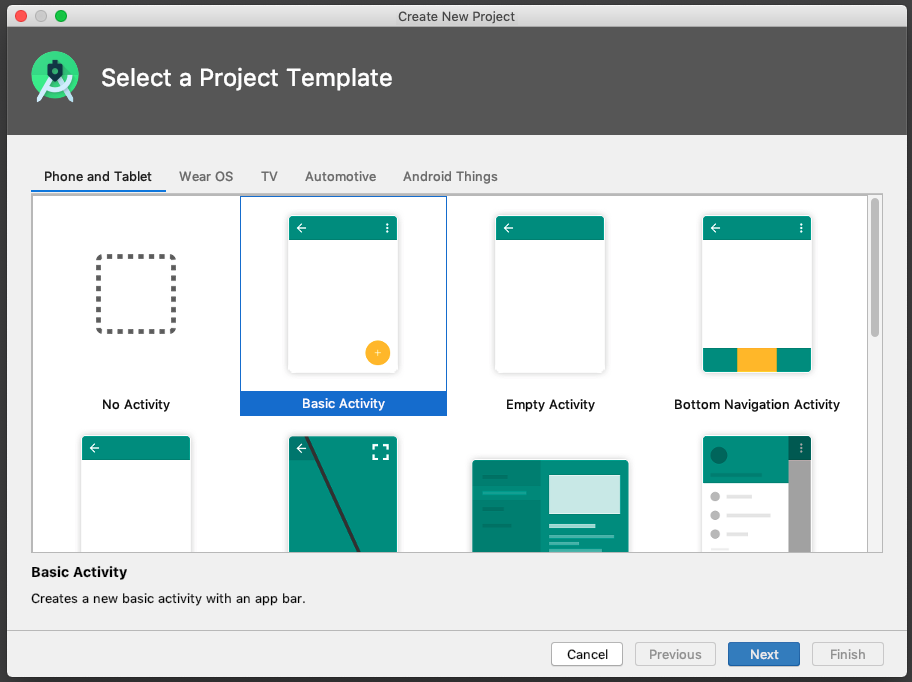
- Requite your application a name, such as My First App.
- Make sure the Linguistic communication is gear up to Kotlin.
- Leave the defaults for the other fields.
- Click End.
Afterwards these steps, Android Studio:
- Creates a folder for your Android Studio project. This is usually in a binder called AndroidStudioProjects below your dwelling house directory.
- Builds your project (this may have a few moments). Android Studio uses Gradle equally its build system. You can follow the build progress at the lesser of the Android Studio window.
- Opens the code editor showing your project.
Step ii: Become your screen fix up
When your project first opens in Android Studio, at that place may be a lot of windows and panes open. To go far easier to get to know Android Studio, here are some suggestions on how to customize the layout.
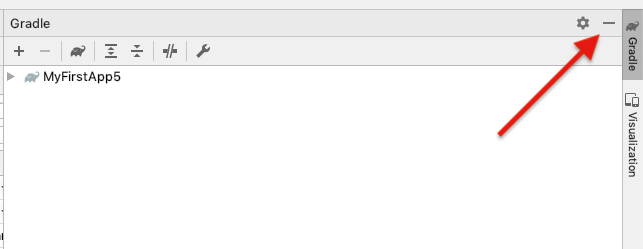
- If there's a Gradle window open on the correct side, click on the minimize button (—) in the upper right corner to hide information technology.
- Depending on the size of your screen, consider resizing the pane on the left showing the project folders to accept upwards less space.
At this point, your screen should look a flake less chaotic, similar to the screenshot shown below.

Stride 3: Explore the project structure and layout
The upper left of the Android Studio window should look similar to the following diagram: 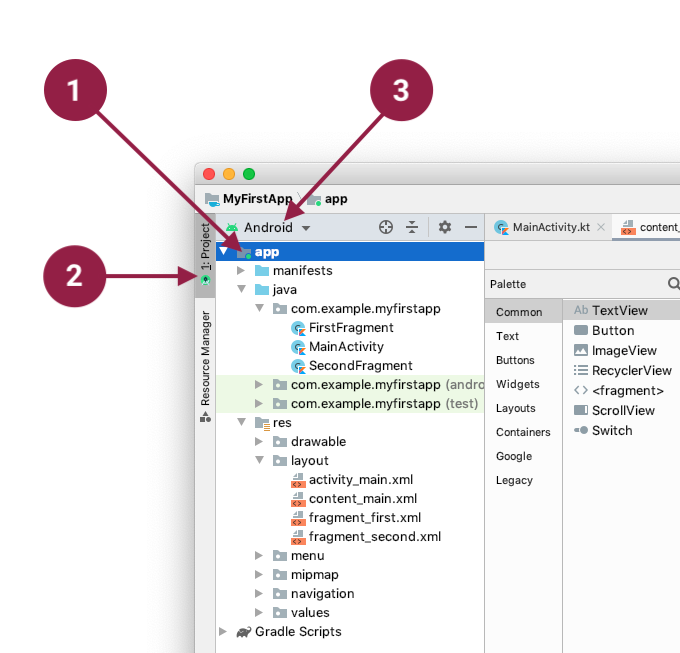
Based on you selecting the Basic Activity template for your project, Android Studio has ready a number of files for you. Y'all can look at the bureaucracy of the files for your app in multiple means, one of which is in Project view (2). Project view shows your files and folders structured in a manner that is convenient for working with an Android projection. (This does not always lucifer the file bureaucracy! To come across the file hierarchy, cull the Project files view past clicking (3).)
- Double-click the app (1) folder to expand the hierarchy of app files. (Run across (ane) in the screenshot.)
- If you click Project (two), you lot can hide or show the Project view.
- The electric current Projection view selection is Projection > Android.
In the Project > Android view you lot run into three or four pinnacle-level folders below your app folder: manifests, java, java (generated) and res. You may non see java (generated) right away.
- Expand the manifests folder.
This binder contains AndroidManifest.xml . This file describes all the components of your Android app and is read past the Android runtime system when your app is executed. 2. Expand the java folder. All your Kotlin language files are organized here; Android projects continue all Kotlin language files in this folder, together with whatever Coffee sources. The java folder contains three subfolders:
com.example.myfirstapp (or the domain name you have specified): This folder contains the Kotlin source code files for your app.
com.example.myfirstapp (androidTest): This folder is where you lot would put your instrumented tests, which are tests that run on an Android device. It starts out with a skeleton test file.
com.example.myfirstapp (test): This binder is where you would put your unit tests. Unit of measurement tests don't need an Android device to run. It starts out with a skeleton unit examination file. 3. Aggrandize the res folder. This folder contains all the resources for your app, including images, layout files, strings, icons, and styling. It includes these subfolders:
drawable: All your app'south images will be stored in this folder.
layout: This folder contains the UI layout files for your activities. Currently, your app has one activity that has a layout file chosen activity_main.xml. It likewise contains content_main.xml, fragment_first.xml, and fragment_second.xml.
menu: This binder contains XML files describing any menus in your app.
mipmap: This binder contains the launcher icons for your app.
navigation: This binder contains the navigation graph, which tells Android Studio how to navigate betwixt unlike parts of your application.
values: Contains resources, such as strings and colors, used in your app.
Step 4: Create a virtual device (emulator)
In this job, you will use the Android Virtual Device (AVD) director to create a virtual device (or emulator) that simulates the configuration for a particular type of Android device.
The first step is to create a configuration that describes the virtual device.
- In Android Studio, select Tools > AVD Managing director, or click the AVD Manager icon in the toolbar.

- Click +Create Virtual Device. (If you have created a virtual device before, the window shows all of your existing devices and the +Create Virtual Device button is at the bottom.) The Select Hardware window shows a list of pre-configured hardware device definitions.
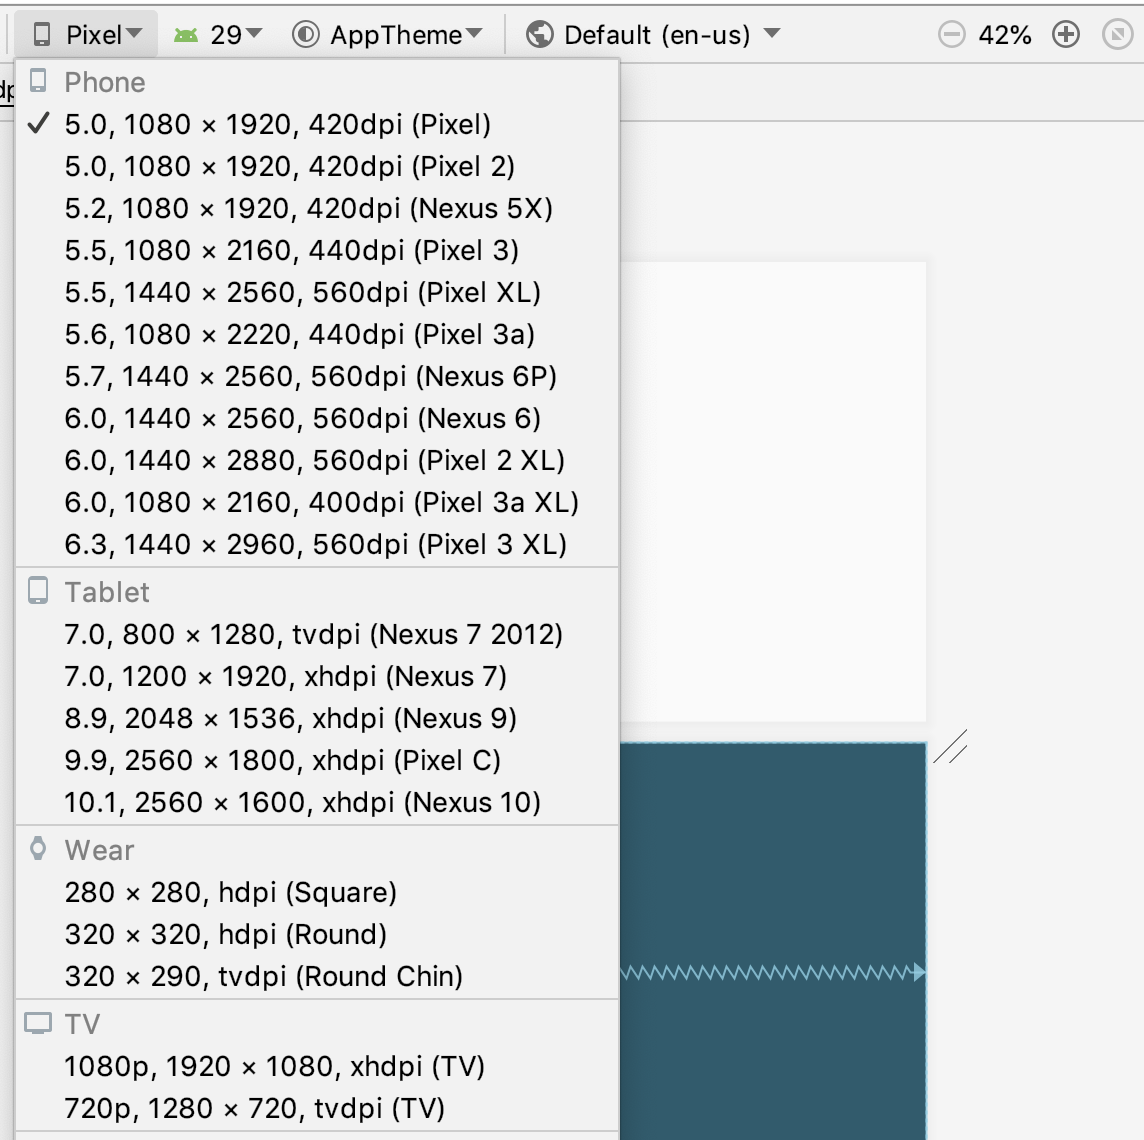
- Cull a device definition, such as Pixel two, and click Side by side. (For this codelab, it actually doesn't matter which device definition you pick).
- In the System Image dialog, from the Recommended tab, choose the latest release. (This does matter.)
- If a Download link is visible side by side to a latest release, it is not installed yet, and you demand to download information technology first. If necessary, click the link to offset the download, and click Next when it's washed. This may take a while depending on your connection speed.
- In the next dialog box, accept the defaults, and click Finish.
The AVD Manager at present shows the virtual device you added.
- If the Your Virtual Devices AVD Manager window is yet open, become ahead and shut it.
Footstep 5: Run your app on your new emulator
- In Android Studio, select Run > Run 'app', or click the Run icon in the toolbar.
 The icon changes one time your app is running.
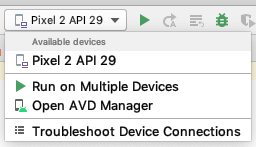
- In Run > Select Device, under Available devices, select the virtual device that you just configured. A dropdown bill of fare likewise appears in the toolbar.
The emulator starts and boots just similar a physical device. Depending on the speed of your computer, this may take a while. You can look in the small horizontal status bar at the very lesser of Android Studio for letters to see the progress.
| Messages that might appear briefly in the status bar | ||
| Gradle build running | | |
| Waiting for target device to come on line | | |
| Installing APK | | |
| Launching activity | | |


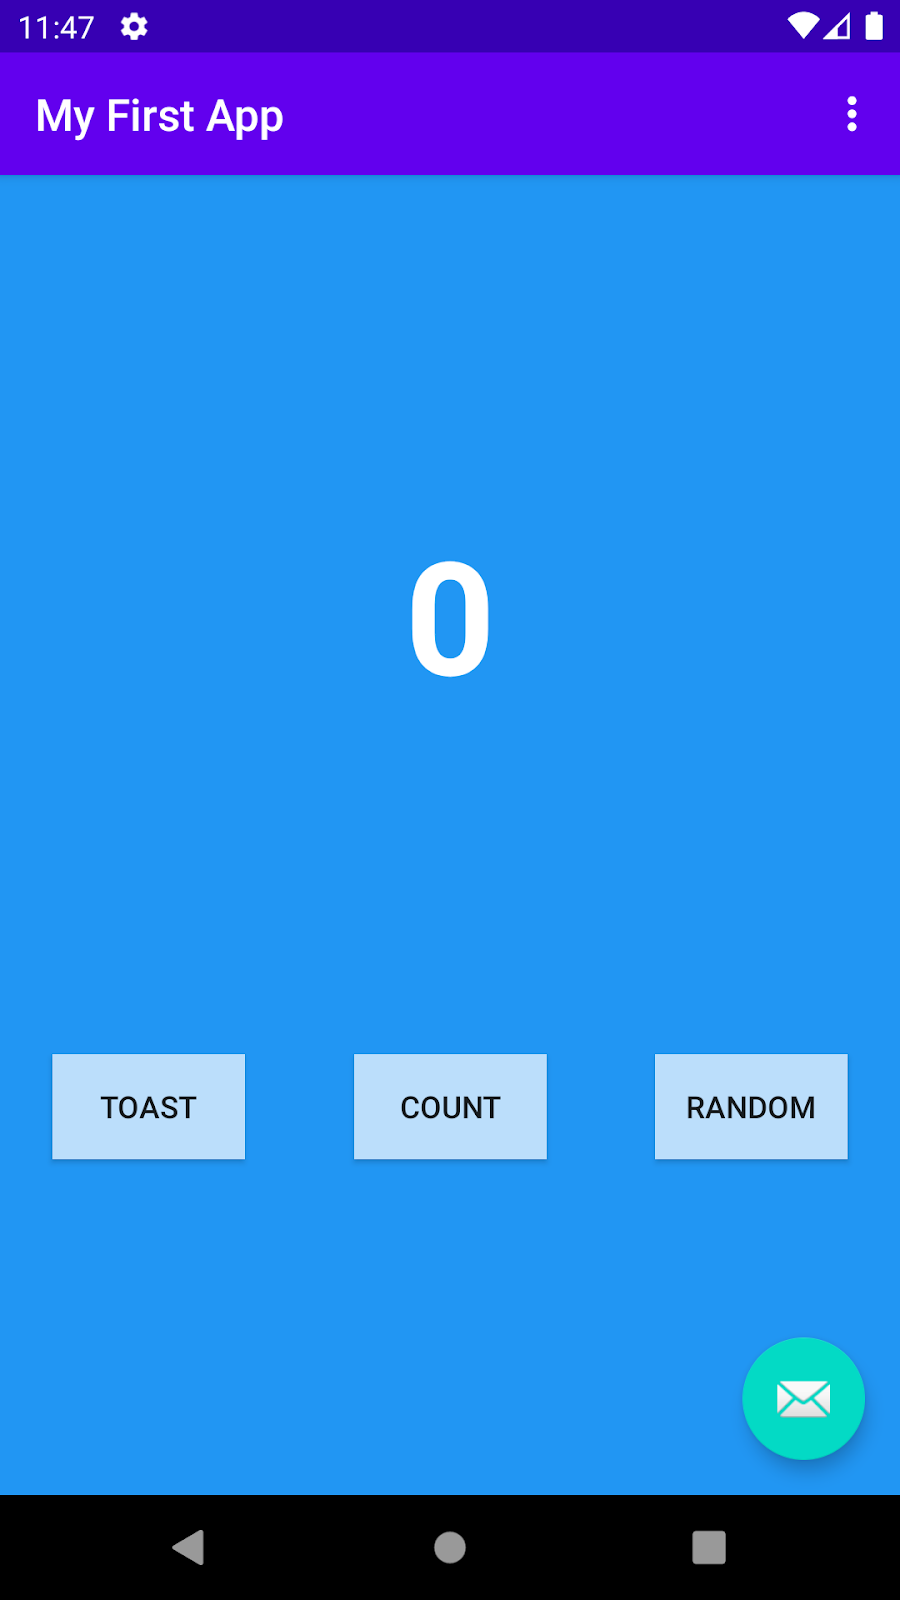
In one case your app builds and the emulator is ready, Android Studio uploads the app to the emulator and runs information technology. You should run into your app as shown in the following screenshot.

Step six: Run your app on a device (if you take ane)
What you need:
- An Android device such as a telephone or tablet.
- A data cable to connect your Android device to your computer via the USB port.
- If you are using a Linux or Windows Os, yous may need to perform additional steps to run your app on a hardware device. Check the Run Apps on a Hardware Device documentation. On Windows, yous may demand to install the appropriate USB driver for your device. See OEM USB Drivers.
Run your app on a device
To allow Android Studio communicate with your device, you must turn on USB Debugging on your Android device.
On Android four.two and higher, the Developer options screen is hidden by default. To show Developer options and enable USB Debugging:
- On your device, open Settings > About phone and tap Build number seven times.
- Return to the previous screen (Settings). Programmer options appears at the lesser of the list. Tap Developer options.
- Enable USB Debugging.
Now you can connect your device and run the app from Android Studio.
- Connect your device to your development motorcar with a USB cablevision. On the device, y'all might need to concur to let USB debugging from your development device.
- In Android Studio, click Run in the toolbar at the height of the window. (You might need to select View > Toolbar to see this selection.) The Select Deployment Target dialog opens with the list of available emulators and continued devices.
- Select your device, and click OK. Android Studio installs the app on your device and runs information technology.
Troubleshooting
If you lot're stuck, quit Android Studio and restart it.
If Android Studio does not recognize your device, try the following:
- Disconnect your device from your evolution machine and reconnect it.
- Restart Android Studio.
If your computer notwithstanding does not find the device or declares it "unauthorized":
- Disconnect the device.
- On the device, open Settings->Developer Options.
- Tap Revoke USB Debugging authorizations.
- Reconnect the device to your computer.
- When prompted, grant authorizations.
If you are withal having trouble, check that you installed the appropriate USB commuter for your device. See the Using Hardware Devices documentation.
Check the troubleshooting section in the Android Studio documentation.
Footstep vii: Explore the app template
When you created the projection and selected Basic Activity, Android Studio gear up a number of files, folders, and as well user interface elements for you, so y'all tin can start out with a working app and major components in place. This makes it easier to build your awarding.
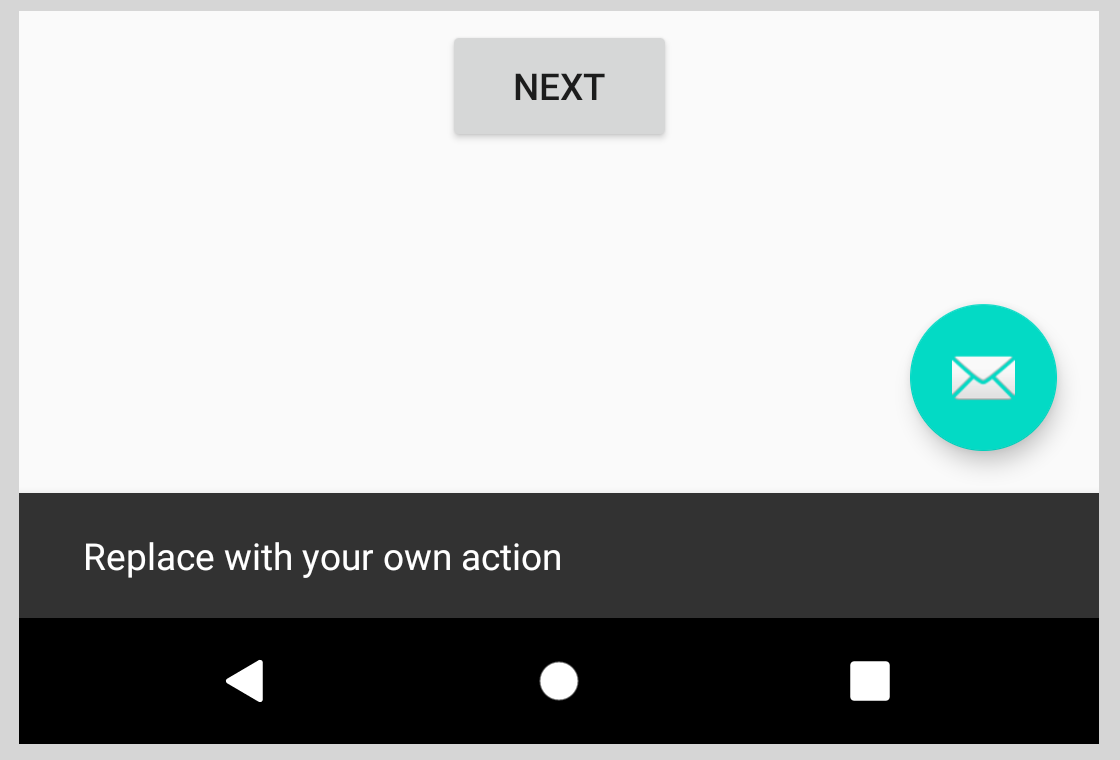
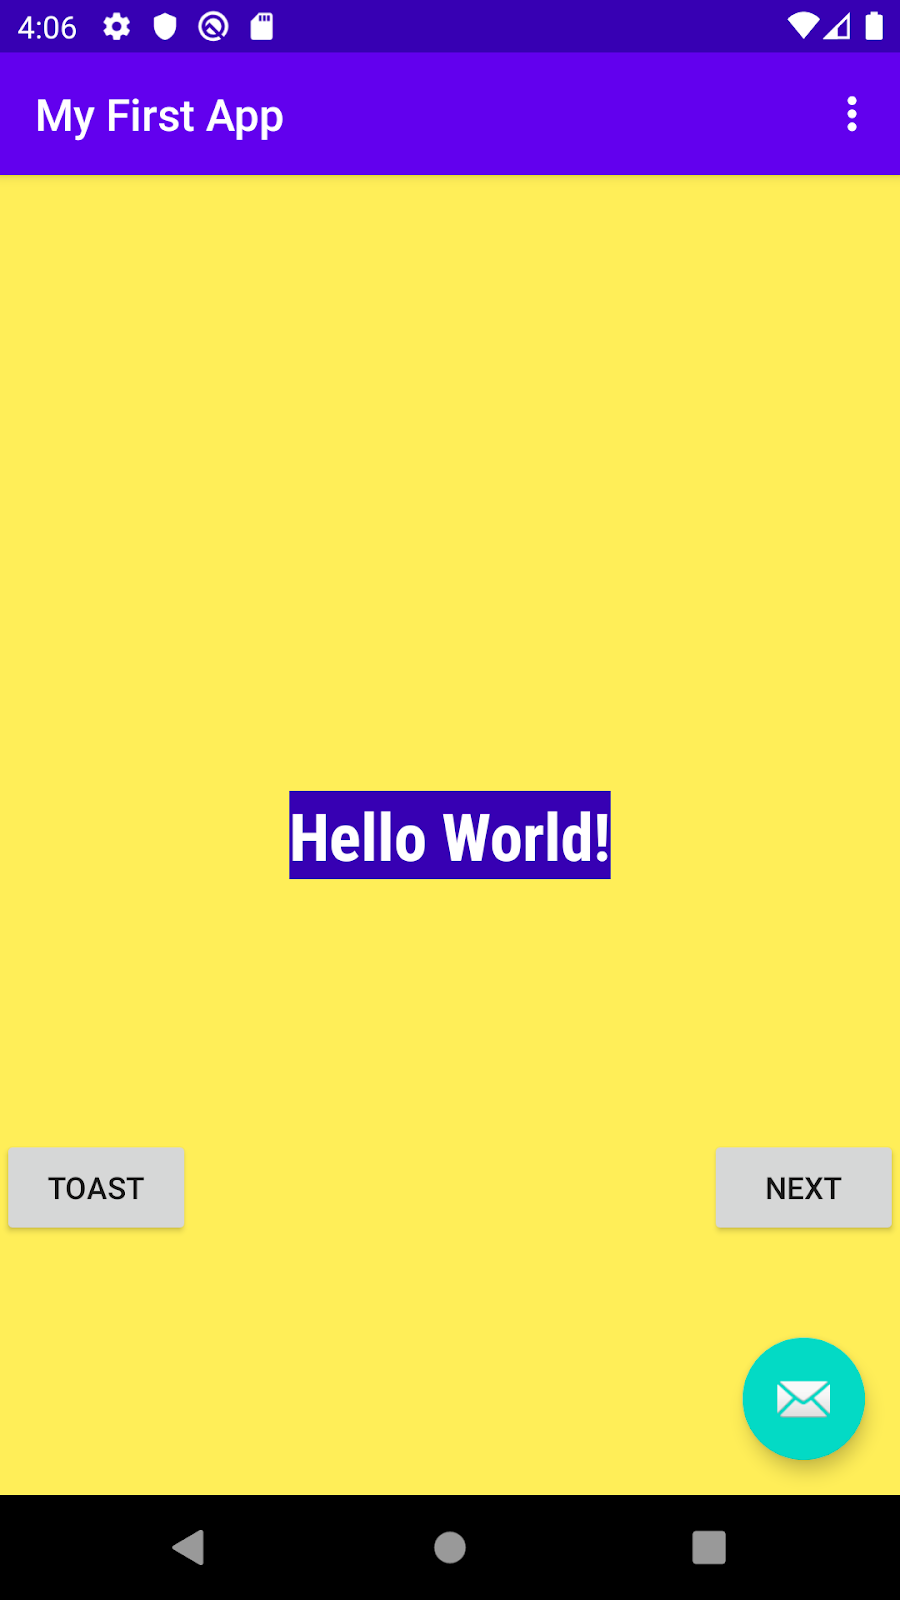
Looking at your app on the emulator or your device, in addition to the Next button, discover the floating activity button with an e-mail icon.  If y'all tap that button, you'll see it has been set up upwardly to briefly show a bulletin at the bottom of the screen. This bulletin infinite is called a snackbar, and it's one of several ways to notify users of your app with brief information.
At the top right of the screen, there's a menu with 3 vertical dots.  If y'all tap on that, y'all'll come across that Android Studio has also created an options carte du jour with a Settings particular. Choosing Settings doesn't do annihilation yet, but having information technology set upward for you makes it easier to add user-configurable settings to your app.
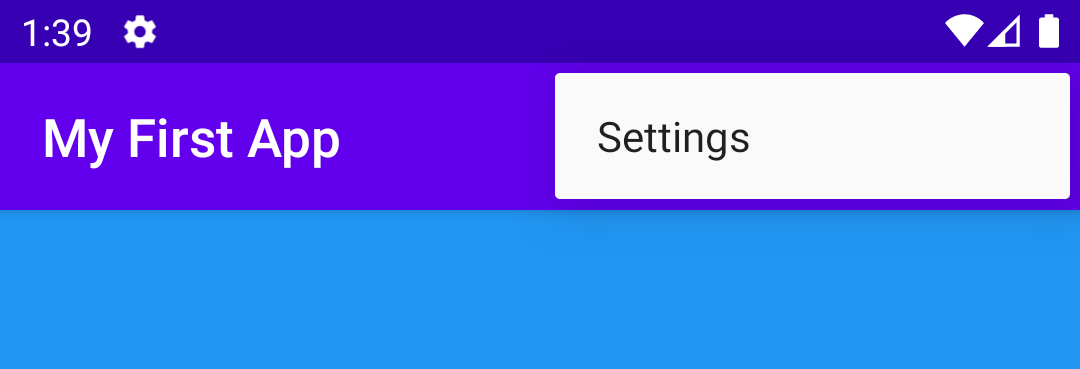
Later in this codelab, you lot'll look at the Side by side push and modify the manner it looks and what it does.
4. Task: Explore the layout editor
Mostly, each screen in your Android app is associated with one or more fragments. The single screen displaying "Hello first fragment" is created by i fragment, called FirstFragment. This was generated for you lot when you created your new project. Each visible fragment in an Android app has a layout that defines the user interface for the fragment. Android Studio has a layout editor where yous can create and ascertain layouts.
Layouts are defined in XML. The layout editor lets you ascertain and modify your layout either past coding XML or past using the interactive visual editor.
Every element in a layout is a view. In this job, you'll explore some of the panels in the layout editor, and you'll learn how to change backdrop of views.
What you'll learn
- How to use the layout editor.
- How to set property values.
- How to add string resources.
- How to add color resources.
Footstep 1: Open the layout editor
- Notice and open the layout binder (app > res > layout) on the left side in the Project console.

- Double-click
fragment_first.xml.
The panels to the correct of the Project view contain the Layout Editor. They may be arranged differently in your version of Android Studio, but the function is the aforementioned. 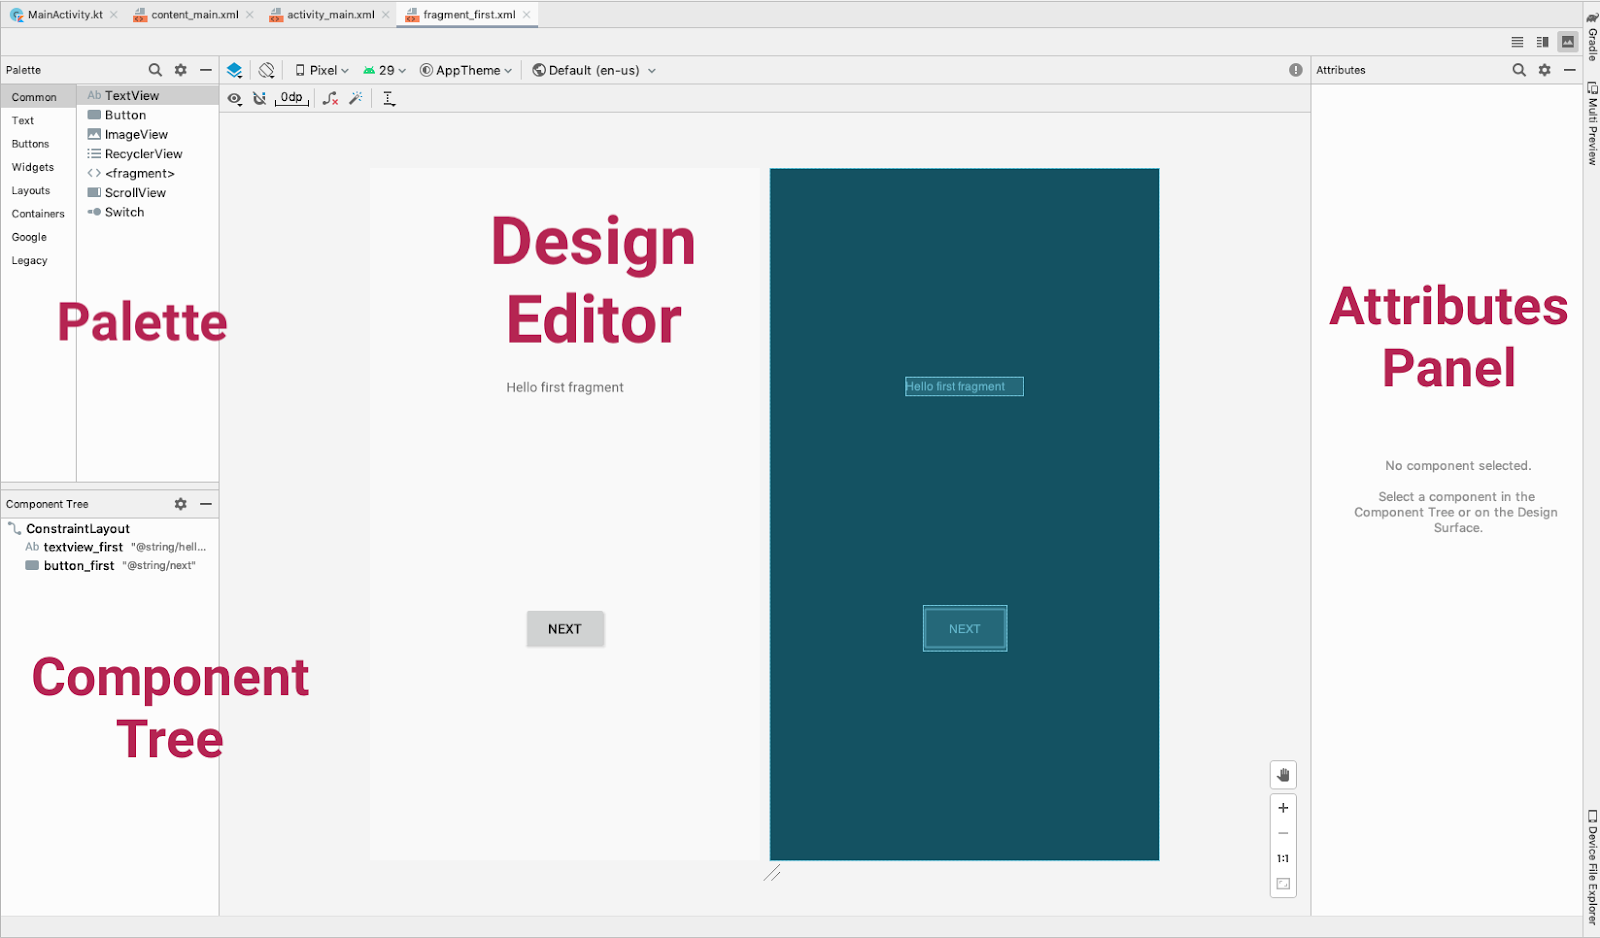
On the left is a Palette of views you can add to your app.
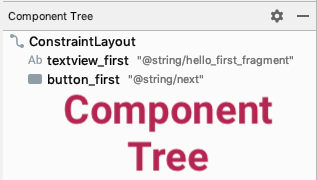
Below that is a Component Tree showing the views currently in this file, and how they are arranged in relation to each other.
In the center is the Blueprint editor, which shows a visual representation of what the contents of the file volition look similar when compiled into an Android app. You can view the visual representation, the XML code, or both.
- In the upper right corner of the Blueprint editor, higher up Attributes, discover the three icons that look like this:
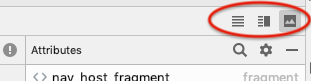 These correspond Code (code just), Split (code + blueprint), and Design (design only) views.
 - Try selecting the unlike modes. Depending on your screen size and piece of work style, yous may adopt switching betwixt Code and Blueprint, or staying in Split view. If your Component Tree disappears, hide and show the Palette.
Split view: 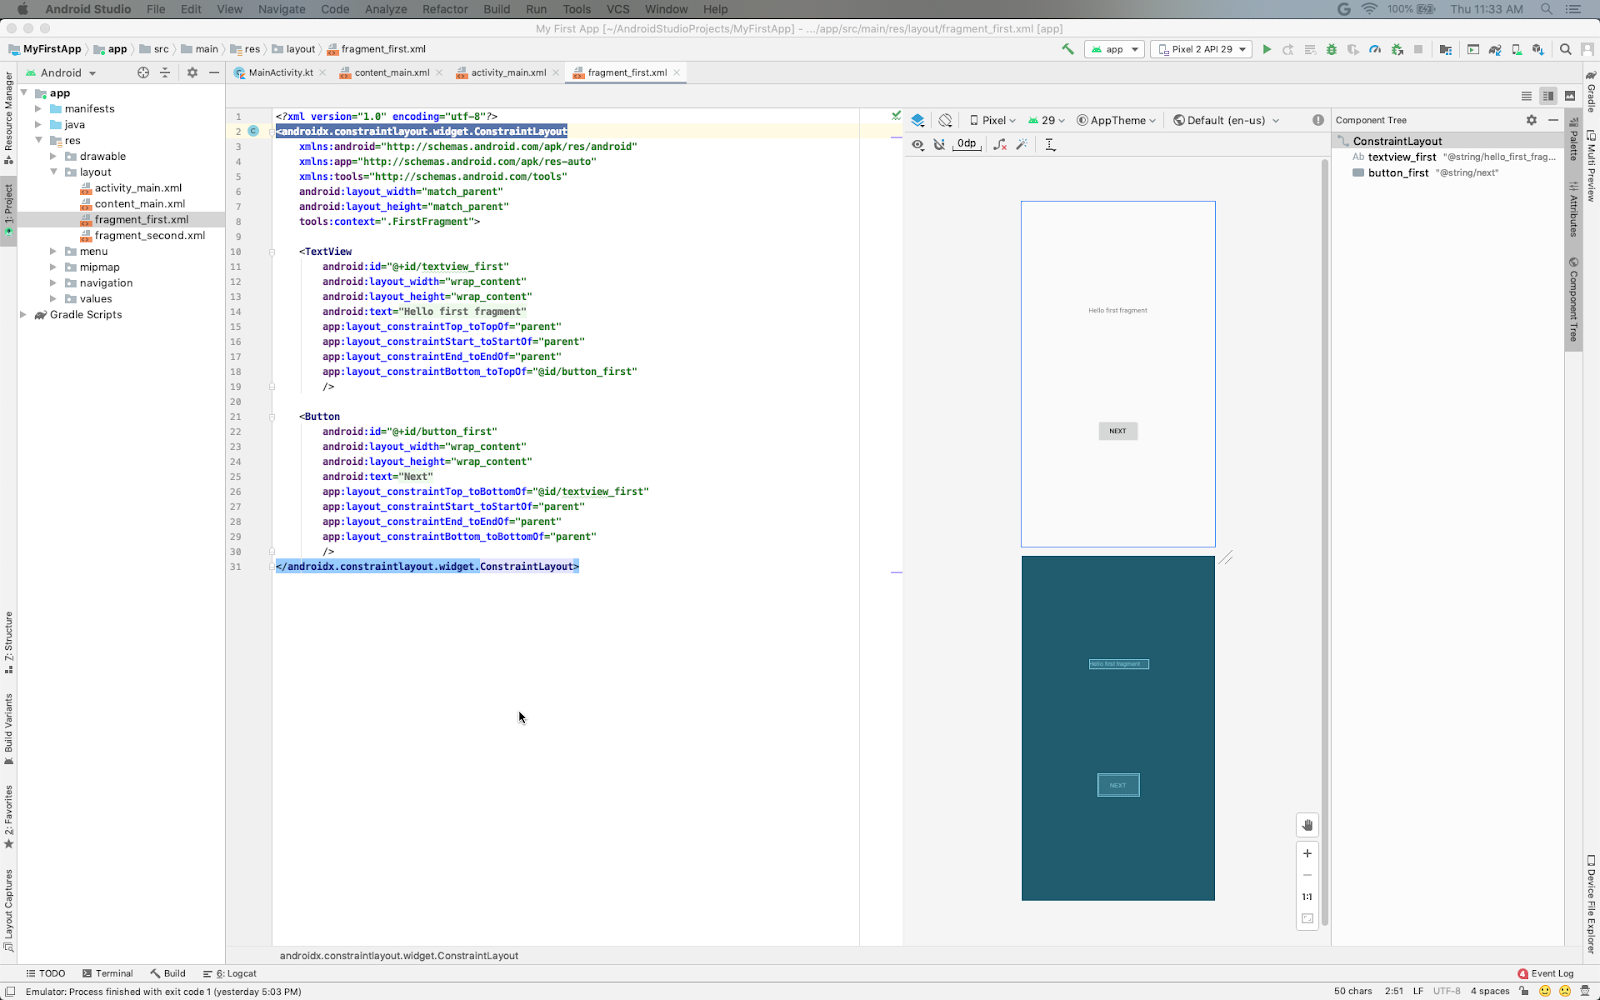
- At the lower right of the Design editor you lot see + and - buttons for zooming in and out. Use these buttons to adjust the size of what you meet, or click the zoom-to-fit button then that both panels fit on your screen.
The Design layout on the left shows how your app appears on the device. The Blueprint layout, shown on the right, is a schematic view of the layout.
- Practice using the layout menu in the top left of the design toolbar to display the blueprint view, the blueprint view, and both views side by side.
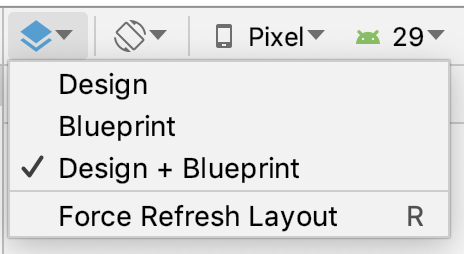
Depending on the size of your screen and your preference, you may wish to merely prove the Blueprint view or the Blueprint view, instead of both.
- Use the orientation icon to change the orientation of the layout. This allows you to test how your layout will fit portrait and landscape modes.

- Use the device menu to view the layout on dissimilar devices. (This is extremely useful for testing!)
On the right is the Attributes panel. You'll learn about that afterwards.
Step 2: Explore and resize the Component Tree
- In
fragment_first.xml, look at the Component Tree. If it's not showing, switch the way to Design instead of Split or Code.
This panel shows the view bureaucracy in your layout, that is, how the views are arranged in relation to each other. ii. If necessary, resize the Component Tree so you can read at to the lowest degree office of the strings. 3. Click the Hide icon at the top right of the Component Tree. 
The Component Tree closes. 4. Bring back the Component Tree by clicking the vertical characterization Component Tree on the left.
Step 3: Explore view hierarchies
- In the Component Tree, discover that the root of the view hierarchy is a
ConstraintLayoutview.
Every layout must have a root view that contains all the other views. The root view is ever a view group, which is a view that contains other views. A ConstraintLayout is one case of a view group. ii. Notice that the ConstraintLayout contains a TextView, called textview_first and a Button, chosen button_first.

- If the code isn't showing, switch to Code or Split view using the icons in the upper correct corner.
- In the XML code, observe that the root element is
<androidx.constraintlayout.widget.ConstraintLayout>. The root element contains a<TextView>element and a<Button>element.
<androidx.constraintlayout.widget.ConstraintLayout ... > <TextView ... /> <Button ... /> </androidx.constraintlayout.widget.ConstraintLayout> Step four: Change property values
- In the code editor, examine the properties in the
TextViewelement.
<TextView android:layout_width="wrap_content" android:layout_height="wrap_content" android:text="Hello commencement fragment" ... /> - Click on the string in the text property, and yous'll detect it refers to a string resource,
hello_first_fragment.
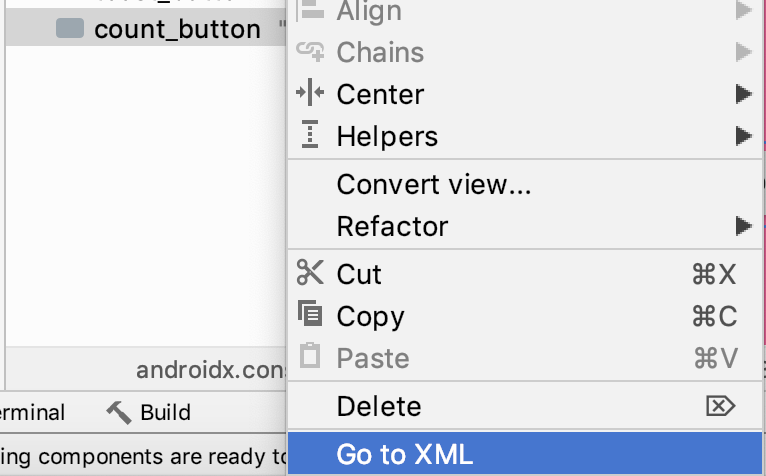
android:text="@string/hello_first_fragment" - Right-click on the property and click Become To > Declaration or Usages
values/strings.xml opens with the string highlighted.
<cord proper name="hello_first_fragment">Hello commencement fragment</cord> - Change the value of the
stringproperty toHello World!. - Switch back to
fragment_first.xml. - Select
textview_firstin the Component Tree.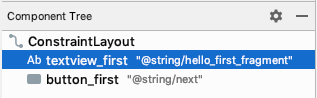
- Look at the Attributes panel on the right, and open the Declared Attributes section if needed.
- In the text field of the
TextViewin Attributes, notice it still refers to the string resources@string/hello_first_fragment. Having the strings in a resource file has several advantages. You tin modify the value of string without having to alter any other code. This simplifies translating your app to other languages, because your translators don't take to know anything about the app code.
- Run the app to see the change you fabricated in strings.xml. Your app now shows "How-do-you-do World!".
Step 5: Change text display backdrop
- With
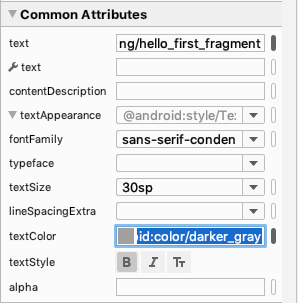
textview_firststill selected in the Component Tree, in the layout editor, in the listing of attributes, under Common Attributes, expand the textAppearance field. (You lot may need to curl down to find it.)

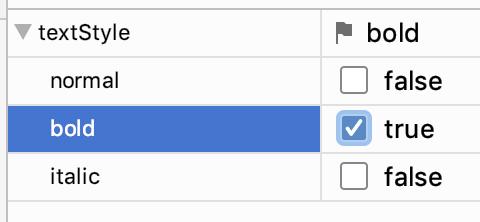
- Change some of the text appearance properties. For example, change the font family, increase the text size, and select bold fashion. (You lot might demand to whorl the panel to see all the fields.)
- Change the text color. Click in the textColor field, and enter
g.
A bill of fare pops up with possible completion values containing the alphabetic character g. This list includes predefined colors.

- Select @android:colour/darker_gray and press Enter.
Below is an example of the textAppearance attributes after making some changes.
- Look at the XML for the
TextView. You see that the new properties take been added.
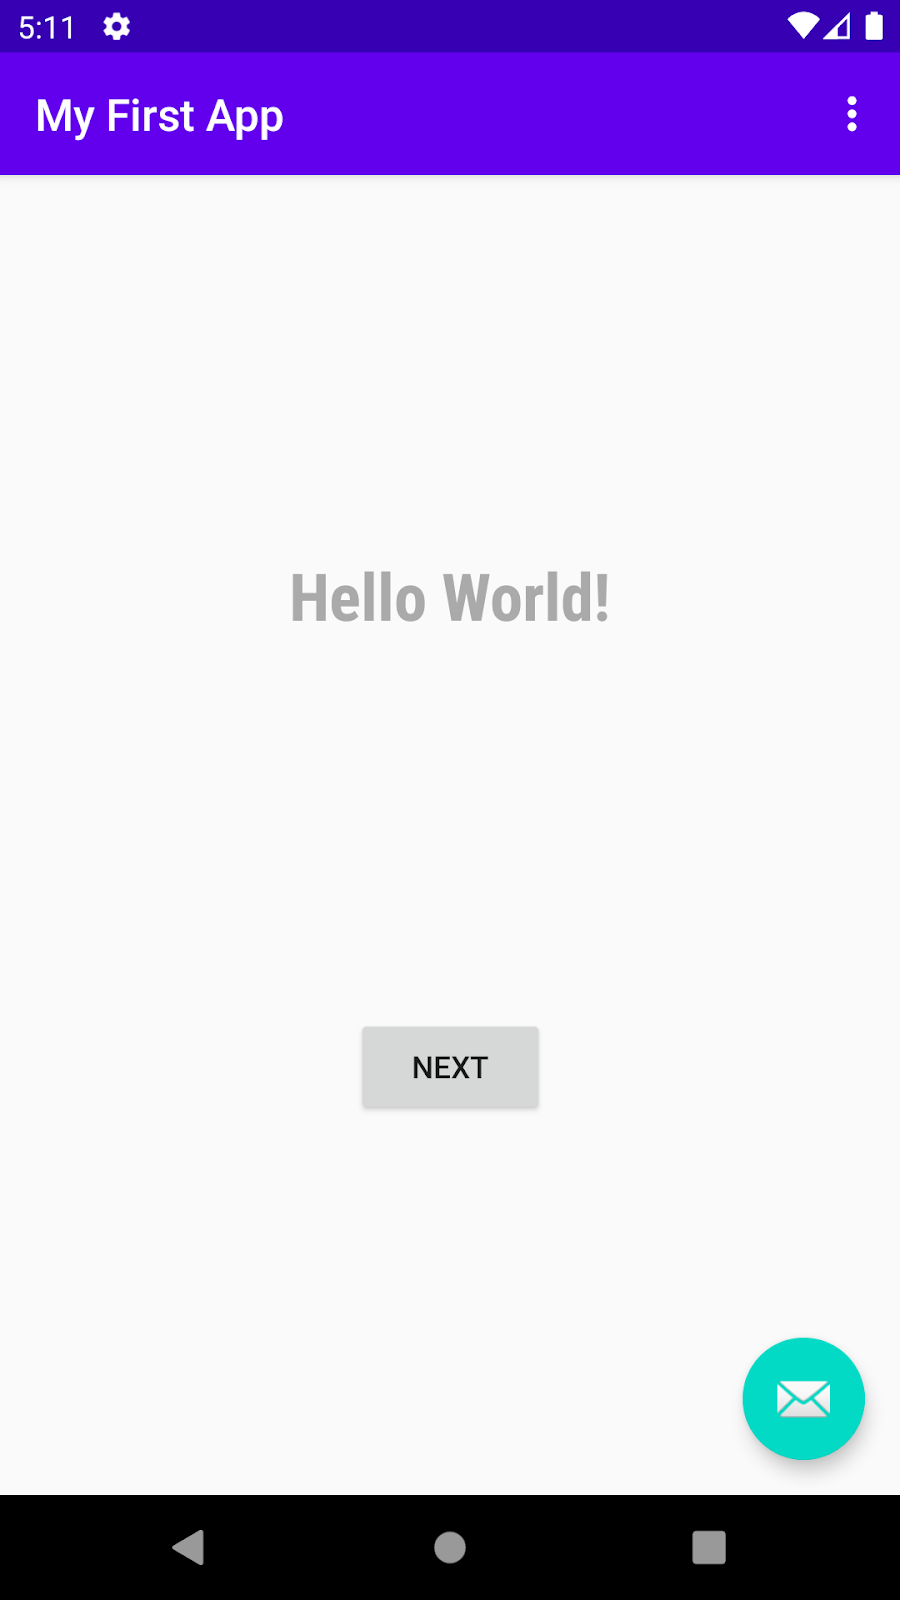
<TextView android:id="@+id/textview_first" android:layout_width="wrap_content" android:layout_height="wrap_content" android:fontFamily="sans-serif-condensed" android:text="@string/hello_first_fragment" android:textColor="@android:color/darker_gray" android:textSize="30sp" android:textStyle="bold" - Run your app once again and see the changes practical to your Hello Globe! string
Footstep 6: Brandish all attributes
- In the Attributes panel, scroll down until you lot find All Attributes.
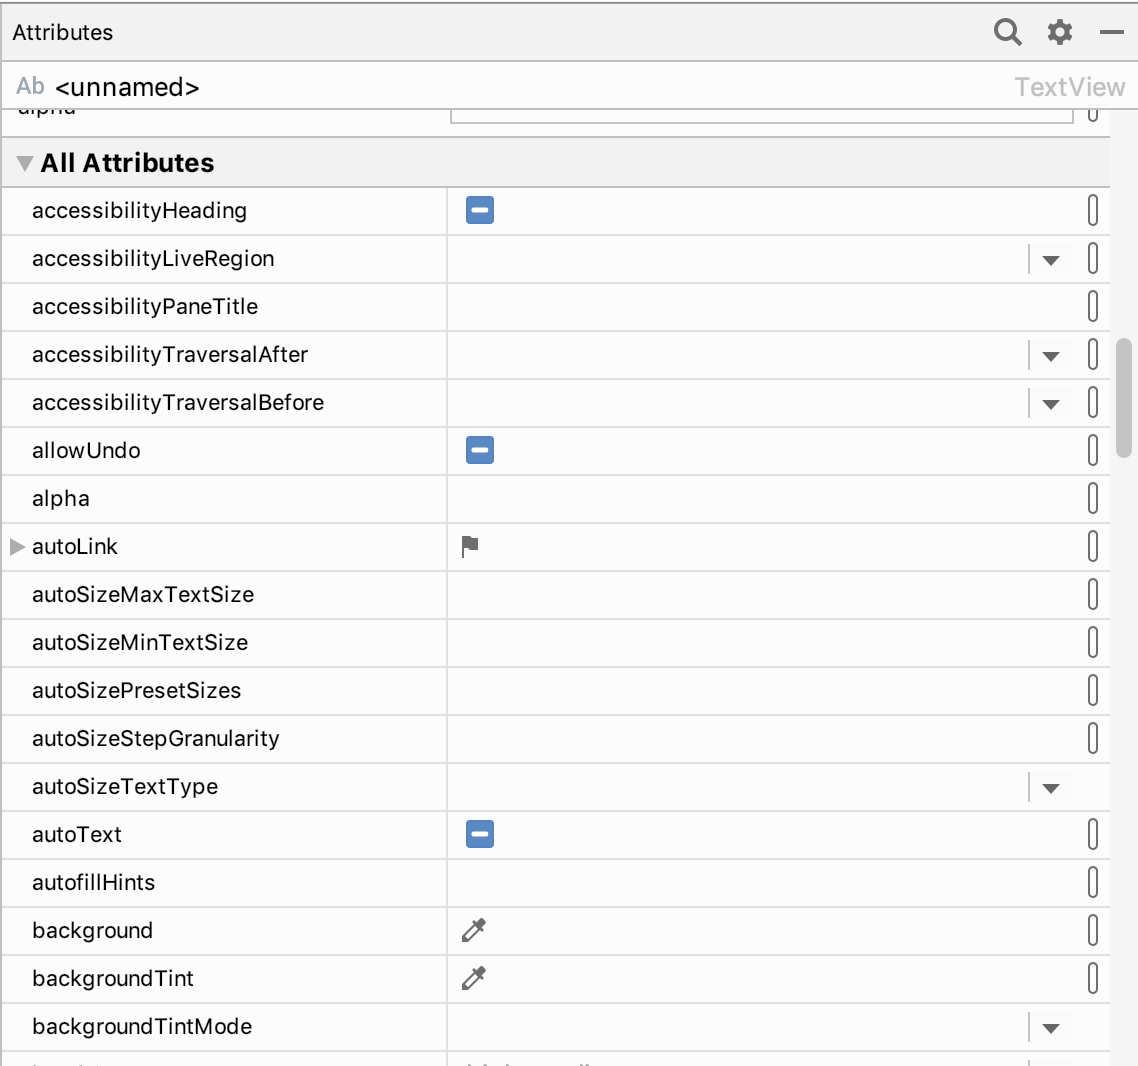
- Scroll through the listing to become an idea of the attributes you lot could set for a
TextView.
5. Task: Add colour resources
So far y'all have learned how to change property values. Adjacent, you lot will acquire how to create more resource like the string resource you worked with earlier. Using resources enables you to use the same values in multiple places, or to ascertain values and have the UI update automatically whenever the value is changed.
What you'll learn
- How resources are divers.
- Adding and using color resources.
- The results of changing layout superlative and width.
Step 1: Add together colour resource
First, you lot'll learn how to add new colour resource.
Alter the text color and background of the TextView
- In the Project panel on the left, double-click on res > values > colors.xml to open the color resource file.

<resources> <colour proper name="colorPrimary">#6200EE</colour> <colour name="colorPrimaryDark">#3700B3</color> <color name="colorAccent">#03DAC5</colour> </resources> The colors.xml file opens in the editor. So far, three colors have been defined. These are the colors you can see in your app layout (for example, purple for the app bar).
- Go back to
fragment_first.xmland then you tin can run into the XML lawmaking for the layout. - Add a new property to the
TextViewcalledandroid:groundwork, and start typing to gear up its value to@color. You can add together this holding anywhere inside the TextView code.
A menu pops upwardly offering the predefined color resources:
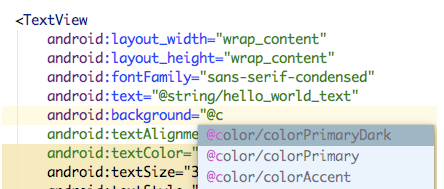
- Choose @color/colorPrimaryDark.
- Modify the property
android:textColorand give it a value of@android:colour/white.
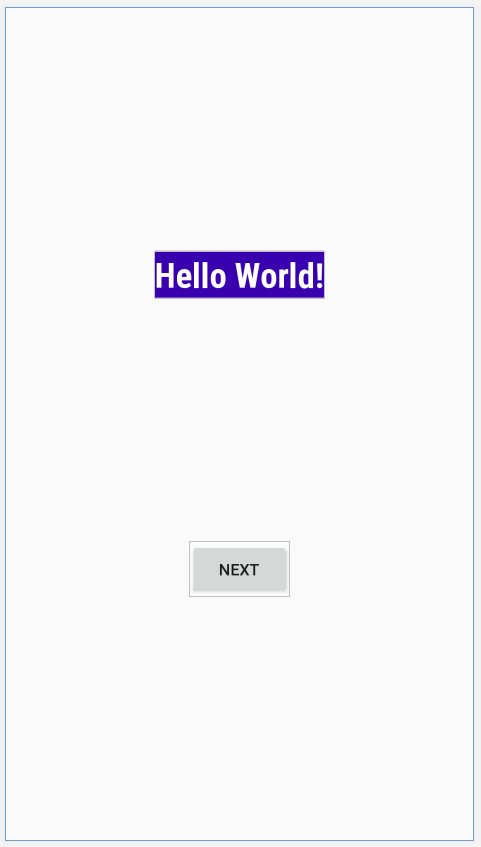
The Android framework defines a range of colors, including white, and so you don't have to define white yourself. 6. In the layout editor, you tin see that the TextView now has a dark blue or royal background, and the text is displayed in white.
Step two: Add a new color to apply as the screen groundwork colour
- Back in
colors.xml, create a new color resource called screenBackground:
<color name="screenBackground">#FFEE58</color> A Colour tin can exist defined as three hexadecimal numbers (#00-#FF, or 0-255) representing the ruby, blue, and light-green (RGB) components. The color you lot just added is xanthous. Notice that the colors corresponding to the lawmaking are displayed in the left margin of the editor.

Note that a colour tin can as well be defined including an alpha value (#00-#FF), which represents the transparency (#00 = 0% = fully transparent, #FF = 100% = fully opaque). When included, the blastoff value is the start of 4 hexadecimal numbers (ARGB).
The blastoff value is a measure of transparency. For example, #88FFEE58 makes the color semi-transparent, and if you use #00FFEE58, information technology's fully transparent and disappears from the left-hand bar.
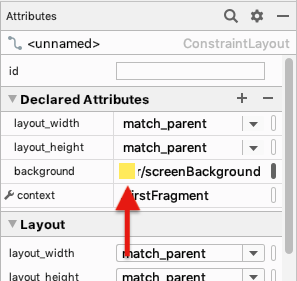
- Go back to
fragment_first.xml. - In the Component Tree, select the
ConstraintLayout.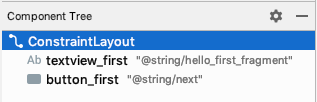
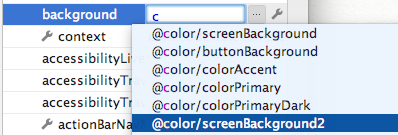
- In the Attributes panel, select the background property and printing Enter. Blazon "c" in the field that appears.
- In the card of colors that appears, select @color/screenBackground. Press Enter to complete the choice.
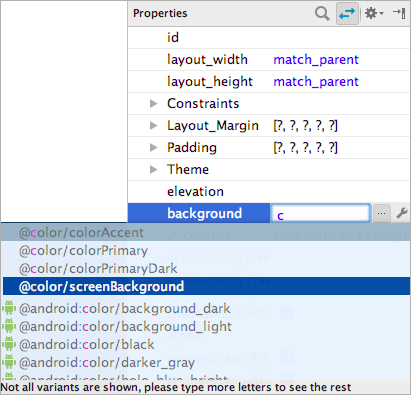
- Click on the yellow patch to the left of the color value in the groundwork field.
It shows a list of colors defined in colors.xml. Click the Custom tab to choose a custom color with an interactive color chooser. 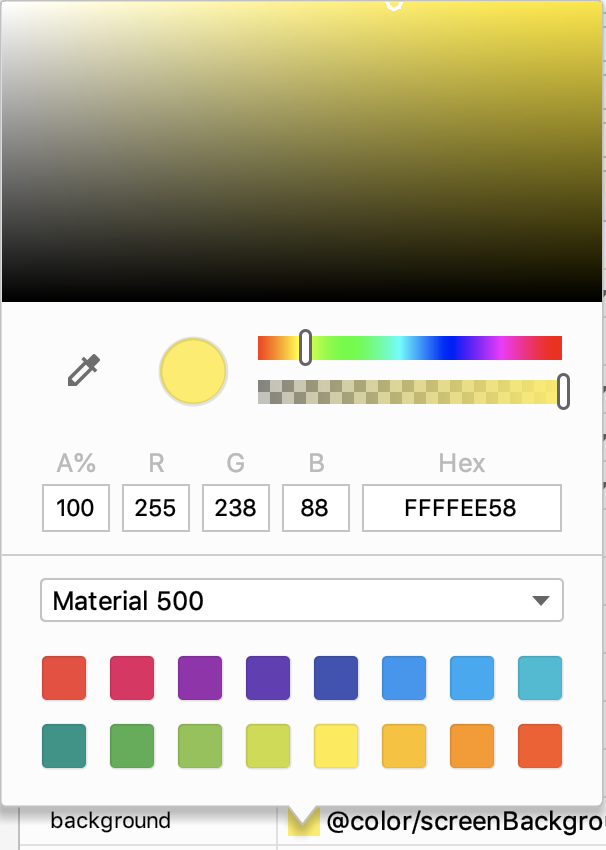
- Experience free to modify the value of the screenBackground color, but make sure that the final colour is noticeably different from the
colorPrimaryandcolorPrimaryDarkcolors.
Step 3: Explore width and height properties
Now that you accept a new screen background color, you lot will utilize it to explore the effects of changing the width and elevation properties of views.
- In
fragment_first.xml, in the Component Tree, select theConstraintLayout.

- In the Attributes panel, find and aggrandize the Layout section.

The layout_width and layout_height properties are both set to match_parent. The ConstraintLayout is the root view of this Fragment, so the "parent" layout size is effectively the size of your screen.
- Notice that the entire groundwork of the screen uses the screenBackground color.
- Select
textview_first. Currently the layout width and peak are wrap_content, which tells the view to exist merely big enough to enclose its content (plus padding) - Change both the layout width and layout peak to match_constraint, which tells the view to be every bit big as whatever it'due south constrained to.
The width and height bear witness 0dp, and the text moves to the upper left, while the TextView expands to lucifer the ConstraintLayout except for the push. The button and the text view are at the same level in the view bureaucracy inside the constraint layout, so they share space.
- Explore what happens if the width is match_constraint and the pinnacle is wrap_content and vice versa. You tin can also change the width and elevation of the button_first.
- Gear up both the width and height of the
TextViewand theButtonback to wrap_content.
6. Task: Add views and constraints
In this job, you volition add together two more buttons to your user interface, and update the existing button, as shown beneath.
What you'll learn
- How to add new views to your layout.
- How to constrain the position of a view to another view.
Step 1: View constraint properties
- In
fragment_first.xml, look at the constraint properties for theTextView.
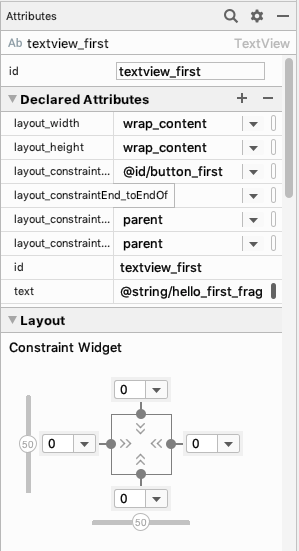
app:layout_constraintBottom_toTopOf="@id/button_first" app:layout_constraintEnd_toEndOf="parent" app:layout_constraintStart_toStartOf="parent" app:layout_constraintTop_toTopOf="parent" These properties define the position of the TextView. Read them advisedly.
You can constrain the summit, bottom, left, and right of a view to the peak, bottom, left, and correct of other views.
- Select
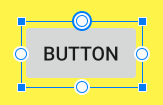
textview_firstin the Component Tree and look at the Constraint Widget in the Attributes panel.

The square represents the selected view. Each of the grey dots represents a constraint, to the top, bottom, left, and right; for this instance, from the TextView to its parent, the ConstraintLayout, or to the Next button for the bottom constraint. 3. Notice that the blueprint and pattern views as well show the constraints when a particular view is selected. Some of the constraints are jagged lines, but the one to the Next button is a squiggle, because it'southward a petty different. You lot'll acquire more than about that in a scrap. 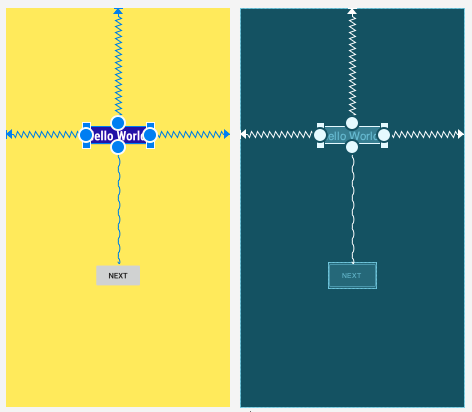
Step 2: Add buttons and constrain their positions
To larn how to use constraints to connect the positions of views to each other, you lot will add buttons to the layout. Your first goal is to add a push button and some constraints, and change the constraints on the Next button.
- Notice the Palette at the top left of the layout editor. Move the sides if you need to, so that you can see many of the items in the palette.
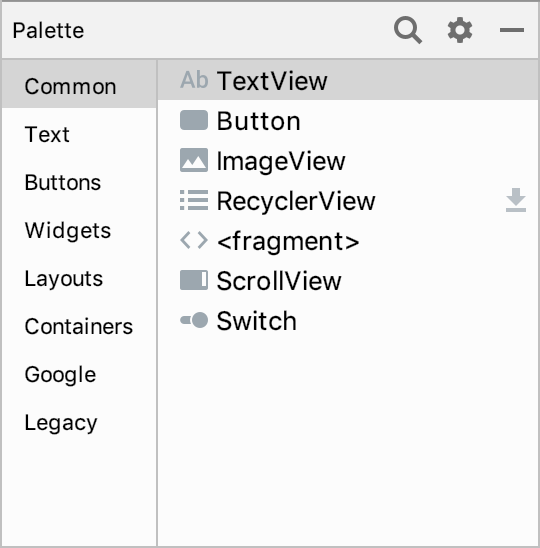 2. Click on some of the categories, and scroll the listed items if needed to get an idea of what'south available. three. Select Button, which is nigh the top, and elevate and driblet information technology onto the design view, placing it underneath the
 TextView near the other push.
Step three: Add a constraint to the new button
You will now constrain the meridian of the push to the bottom of the TextView.
- Move the cursor over the circumvolve at the top of the
Button.
- Click and drag the circle at the top of the
Push buttononto the circle at the lesser of theTextView.
The Button moves up to sit only below the TextView because the superlative of the button is at present constrained to the bottom of the TextView.

- Have a look at the Constraint Widget in the Layout pane of the Attributes panel. Information technology shows some constraints for the
Button, including Top -> BottomOf textView. - Accept a look at the XML lawmaking for the push. It now includes the attribute that constrains the top of the push button to the bottom of the
TextView.
app:layout_constraintTop_toBottomOf="@+id/textview_first" - You lot may see a warning, "Non Horizontally Constrained". To fix this, add a constraint from the left side of the button to the left side of the screen.
- Likewise add together a constraint to constrain the bottom of the button to the bottom of the screen.
Before adding some other button, relabel this button so things are a trivial clearer about which push is which.
- Click on the button you just added in the design layout.
- Look at the Attributes panel on the right, and discover the id field.
- Change the id from
push buttontotoast_button.
Step 4: Arrange the Side by side button
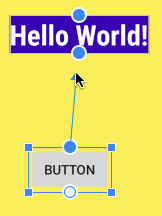
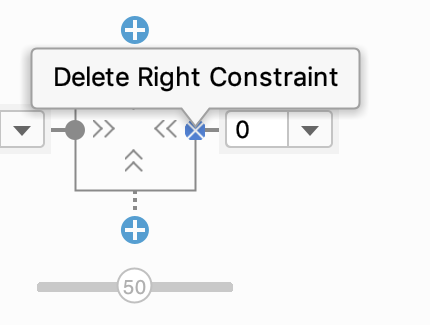
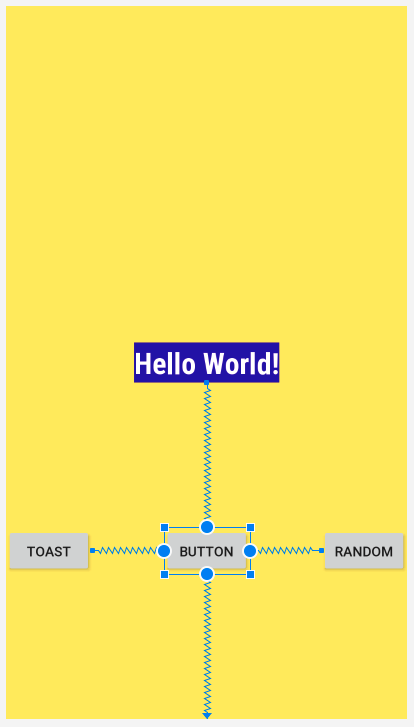
You will adapt the button labeled Next, which Android Studio created for you when y'all created the projection. The constraint between it and the TextView looks a little unlike, a wavy line instead of a jagged one, with no arrow. This indicates a chain, where the constraints link two or more objects to each other, instead of but one to some other. For now, you'll delete the chained constraints and replace them with regular constraints.
To delete a constraint:
- In the pattern view or blueprint view, hold the
Ctrlkey (Commandon a Mac) and movement the cursor over the circumvolve for the constraint until the circle highlights, then click the circumvolve.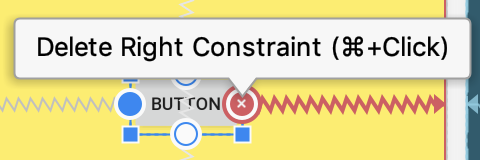
- Or click on ane of the constrained views, then right-click on the constraint and select Delete from the carte.
- Or in the Attributes panel, move the cursor over the circumvolve for the constraint until it shows an x, so click it.
If y'all delete a constraint and want it dorsum, either undo the action, or create a new constraint.
Step 5: Delete the chain constraints
- Click on the Side by side push button, so delete the constraint from the pinnacle of the push button to the
TextView. - Click on the
TextView, and then delete the constraint from the lesser of the text to the Next push button.
Step 6: Add together new constraints
- Constrain the right side of the Next button to the right of the screen if it isn't already.
- Delete the constraint on the left side of the Next button.
- Now constrain the top and lesser of the Side by side button so that the top of the button is constrained to the bottom of the
TextViewand the bottom is constrained to the bottom of the screen. The correct side of the button is constrained to the right side of the screen. - Also constrain the
TextViewto the bottom of the screen.
It may seem like the views are jumping around a lot, just that'due south normal as y'all add and remove constraints.
Your layout should now look something like this. 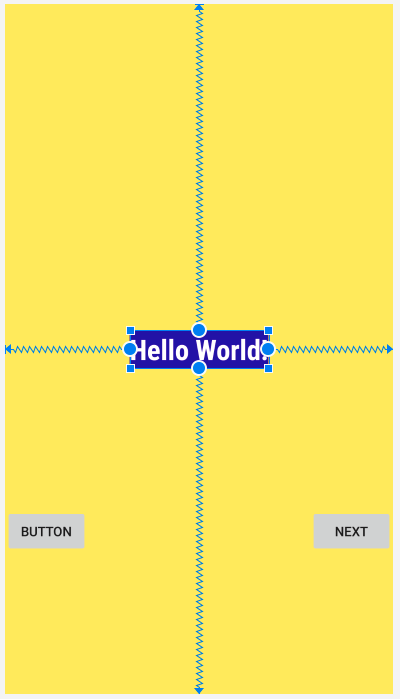
- In the
fragment_first.xmllayout file, find the text belongings for thetoast_buttonbutton.
<Button android:id="@+id/toast_button" android:layout_width="wrap_content" android:layout_height="wrap_content" android:text="Button" - Discover that the text
"Button"is directly in the layout field, instead of referencing a string resources as theTextViewdoes. This will make it harder to translate your app to other languages. - To fix this, click the highlighted code. A lite seedling appears on the left.
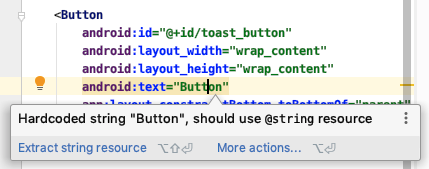
- Click the lightbulb. In the menu that pops up, select Excerpt cord resource.

- In the dialog box that appears, change the resource name to
toast_button_textand the resources value toToastand click OK.

- Notice that the value of the
android:textproperty has changed to@string/toast_button_text.
<Button android:id="@+id/button" android:layout_width="wrap_content" android:layout_height="wrap_content" android:text="@string/toast_button_text" - Go to the res > values > strings.xml file. Notice that a new string resource has been added, named
toast_button_text.
<resources> ... <cord proper name="toast_button_text">Toast</string> </resources> - Run the app to make sure it displays as you expect it to.
You now know how to create new string resources past extracting them from existing field values. (You can as well add new resources to the strings.xml file manually.) And yous know how to change the id of a view.
Step viii: Update the Next button
The Next push already has its text in a string resource, but you'll make some changes to the push to match its new part, which will exist to generate and display a random number.
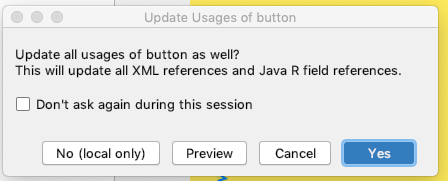
- Equally yous did for the Toast button, change the id of the Next button from
button_firsttorandom_buttonin the Attributes console. - If you become a dialog box request to update all usages of the push button, click Yeah. This will set up whatever other references to the push button in the project code.
- In
strings.xml, right-click on thenextstring resource. - Select Refactor > Rename... and modify the name to
random_button_text. - Click Refactor to rename your string and close the dialog.
- Change the value of the cord from
NexttoRandom. - If you want, motility
random_button_textto belowtoast_button_text.
Pace nine: Add a tertiary push button
Your final layout will have three buttons, vertically constrained the same, and evenly spaced from each other.
- In
fragment_first.xml, add some other button to the layout, and drib it somewhere betwixt the Toast push and the Random push, below theTextView. - Add vertical constraints the same as the other two buttons. Constrain the summit of the third button to the bottom of
TextView; constrain the bottom of the 3rd button to the lesser of the screen. - Add horizontal constraints from the 3rd push to the other buttons. Constrain the left side of the third push button to the right side of the Toast button; constrain the right side of the third push button to the left side of the Random button.
Your layout should look something similar this:
- Examine the XML code for
fragment_first.xml. Do whatsoever of the buttons accept the attributeapp:layout_constraintVertical_bias? It'southward OK if you do not see that constraint.
The "bias" constraints allows you to tweak the position of a view to exist more on 1 side than the other when both sides are constrained in opposite directions. For example, if both the top and bottom sides of a view are constrained to the acme and bottom of the screen, you tin use a vertical bias to identify the view more than towards the top than the bottom.
Here is the XML code for the finished layout. Your layout might have different margins and perhaps some different vertical or horizontal bias constraints.The exact values of the attributes for the appearance of the TextView might be different for your app.
<?xml version="ane.0" encoding="utf-viii"?> <androidx.constraintlayout.widget.ConstraintLayout <?xml version="1.0" encoding="utf-8"?> <androidx.constraintlayout.widget.ConstraintLayout xmlns:android="http://schemas.android.com/apk/res/android" xmlns:app="http://schemas.android.com/apk/res-automobile" xmlns:tools="http://schemas.android.com/tools" android:layout_width="match_parent" android:layout_height="match_parent" android:background="@color/screenBackground" tools:context=".FirstFragment"> <TextView android:id="@+id/textview_first" android:layout_width="wrap_content" android:layout_height="wrap_content" android:background="@color/colorPrimaryDark" android:fontFamily="sans-serif-condensed" android:text="@string/hello_first_fragment" android:textColor="@android:color/white" android:textSize="30sp" android:textStyle="assuming" app:layout_constraintBottom_toBottomOf="parent" app:layout_constraintEnd_toEndOf="parent" app:layout_constraintStart_toStartOf="parent" app:layout_constraintTop_toTopOf="parent" /> <Push button android:id="@+id/random_button" android:layout_width="wrap_content" android:layout_height="wrap_content" android:text="@string/random_button_text" app:layout_constraintBottom_toBottomOf="parent" app:layout_constraintEnd_toEndOf="parent" app:layout_constraintTop_toBottomOf="@+id/textview_first" /> <Push android:id="@+id/toast_button" android:layout_width="wrap_content" android:layout_height="wrap_content" android:text="@string/toast_button_text" app:layout_constraintBottom_toBottomOf="parent" app:layout_constraintStart_toStartOf="parent" app:layout_constraintTop_toBottomOf="@+id/textview_first" /> <Button android:id="@+id/button2" android:layout_width="wrap_content" android:layout_height="wrap_content" android:text="Push button" app:layout_constraintBottom_toBottomOf="parent" app:layout_constraintEnd_toStartOf="@+id/random_button" app:layout_constraintStart_toEndOf="@+id/toast_button" app:layout_constraintTop_toBottomOf="@+id/textview_first" /> </androidx.constraintlayout.widget.ConstraintLayout> Step 10: Get your UI set for the next task
The adjacent task is to make the buttons exercise something when they are pressed. First, y'all need to get the UI prepare.
- Change the text of the
TextViewto show 0 (the number zero). - Change the text alignment to center.

- Change the
idof the last button you lot added,button2, tocount_buttonin the Attributes panel in the blueprint editor. - In the XML, extract the string resource to
count_button_textand set the value toCount. -
The buttons should now take the post-obit text and ids:
| Push | text | id |
| Left button | Toast | @+id/toast_button |
| Middle button | Count | @+id/count_button |
| Correct button | Random | @+id/random_button |
- Run the app.
Step 11: Fix errors if necessary

The errors occur considering the buttons take changed their id and now these constraints are referencing non-existent views.
If you have these errors, prepare them past updating the id of the buttons in the constraints that are underlined in crimson.
app:layout_constraintEnd_toStartOf="@+id/random_button" app:layout_constraintStart_toEndOf="@+id/toast_button" 7. Task: Update the appearance of the buttons and the TextView
Your app'southward layout is at present basically complete, only its appearance tin be improved with a few small changes.
Pace 1: Add together new color resources
- In
colors.xml, alter the value ofscreenBackgroundto#2196F3, which is a blue shade in the Textile Design palette. - Add a new color named
buttonBackground. Use the value#BBDEFB, which is a lighter shade in the blue palette.
<color name="buttonBackground">#BBDEFB</color> Step ii: Add together a background color for the buttons
- In the layout, add together a background color to each of the buttons. (Yous can either edit the XML in
fragment_first.xmlor use the Attributes panel, whichever you adopt.)
android:background="@color/buttonBackground" Step 3: Alter the margins of the left and right buttons
- Give the Toast push a left (showtime) margin of 24dp and give the Random push button a correct (cease) margin of 24dp. (Using first and stop instead of left and right makes these margins piece of work for all linguistic communication directions.)
- One manner to exercise this is to use the Constraint Widget in the Attributes console. The number on each side is the margin on that side of the selected view. Type
24in the field and printing Enter.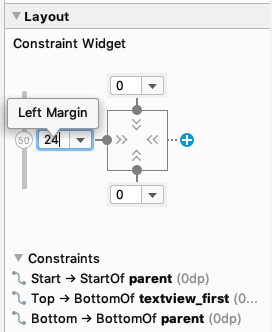
Step 4: Update the appearance of the TextView
- Remove the background color of the
TextView, either by clearing the value in the Attributes console or by removing theandroid:groundworkattribute from the XML lawmaking.
When you lot remove the background, the view groundwork becomes transparent. 2. Increase the text size of the TextView to 72sp.
android:textSize="72sp" - Change the font-family of the
TextViewtosans-serif(if information technology's not already). - Add together an
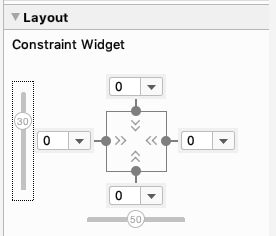
app:layout_constraintVertical_biasbelongings to theTextView, to bias the position of the view upwards a picayune so that information technology is more than evenly spaced vertically in the screen. Feel free to adapt the value of this constraint every bit you lot like. (Check in the design view to see how the layout looks.)
app:layout_constraintVertical_bias="0.iii" - You tin can as well set the vertical bias using the Constraint Widget. Click and elevate the number l that appears on the left side, and slide it upwards until information technology says 30.
- Brand sure the layout_width is wrap_content, and the horizontal bias is 50 (
app:layout_constraintHorizontal_bias="0.5"in XML).
Pace v: Run your app
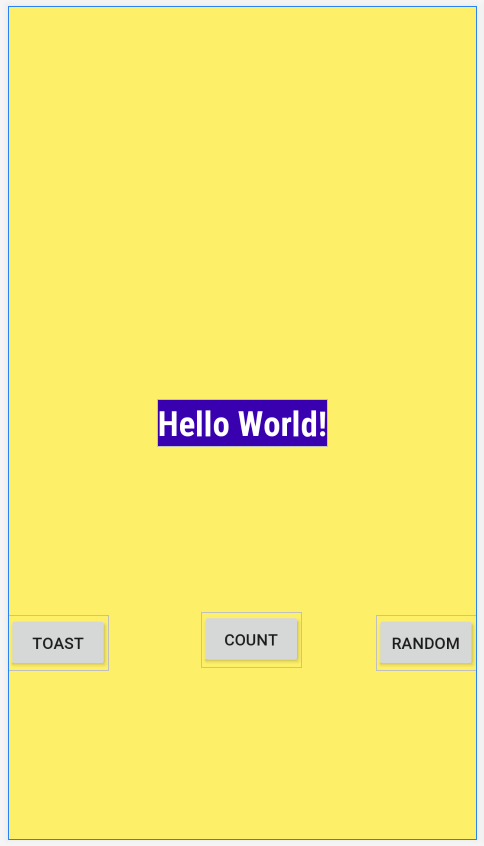
If you implemented all the updates, your app will expect similar the post-obit effigy. If you used unlike colors and fonts, then your app will look a bit different.
8. Task: Make your app interactive
You have added buttons to your app's main screen, but currently the buttons do naught. In this task, you will make your buttons reply when the user presses them.
Get-go yous volition make the Toast button show a pop-upwardly bulletin called a toast. Side by side you will brand the Count button update the number that is displayed in the TextView.
What y'all'll learn
- How to detect a view past its ID.
- How to add click listeners for a view.
- How to set and get property values of a view from your code.
Step one: Enable auto imports
To make your life easier, you tin enable auto-imports so that Android Studio automatically imports any classes that are needed by the Kotlin code.
- In Android Studio, open up the settings editor past going to File > Other Settings > Preferences for New Projects. (Or Settings for New Projects. The text varies between versions of Android Studio.)
- Select Machine Import. In the Java and Kotlin sections, brand certain Add Unambiguous Imports on the wing is checked.
 3. Close the settings editor.
Pace ii: Show a toast
In this footstep, y'all volition attach a Kotlin method to the Toast push button to show a toast when the user presses the button. A toast is a short bulletin that appears briefly at the bottom of the screen.
- Open
FirstFragment.kt. (app > java > com.example.android.myfirstapp > FirstFragment).
This class has only two methods, onCreateView() and onViewCreated(). These methods execute when the fragment starts.
As mentioned earlier, the id for a view helps you place that view distinctly from other views. Using the findViewByID() method, your code can find the random_button using its id, R.id.random_button. two. Have a await at onViewCreated(). It sets up a click listener for the random_button, which was originally created every bit the Side by side button.
view.findViewById<Button>(R.id.random_button).setOnClickListener { findNavController().navigate(R.id.action_FirstFragment_to_SecondFragment) } Here is what this code does:
- Use the
findViewById()method with the id of the desired view as an argument, so set a click listener on that view. - In the body of the click listener, utilise an action, which in this case is for navigating to another fragment, and navigate there. (You will learn about that later.)
- Just below that click listener, add code to set up a click listener for the
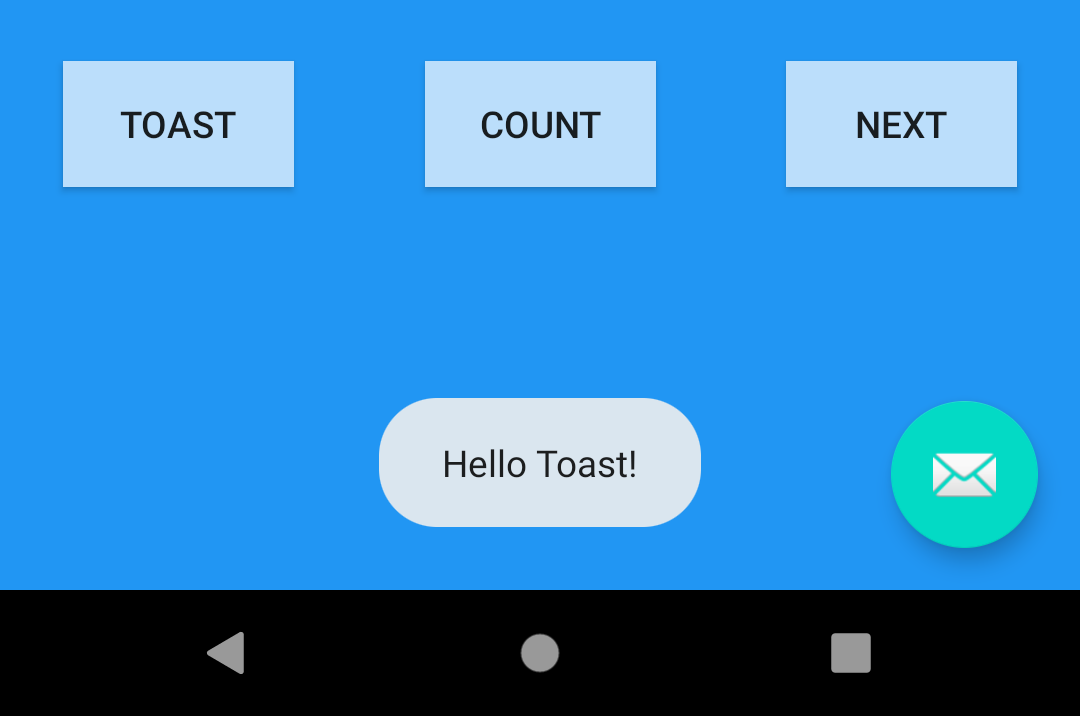
toast_buttonthat creates and displays a toast. Here is the lawmaking:
// notice the toast_button by its ID and set a click listener view.findViewById<Button>(R.id.toast_button).setOnClickListener { // create a Toast with some text, to appear for a short time val myToast = Toast.makeText(context, "Hello Toast!", Toast.LENGTH_SHORT) // show the Toast myToast.show() } - Run the app and press the Toast button. Do y'all see the toasty message at the bottom of the screen?
- If you want, extract the message string into a resource as you lot did for the push labels.
You accept learned that to brand a view interactive yous need to gear up a click listener for the view that says what to do when the view (button) is clicked on. The click listener can either:
- Implement a small-scale amount of code directly.
- Call a method that defines the desired click behavior in the activity.
Step three: Make the Count button update the number on the screen
The method that shows the toast is very unproblematic; information technology does non interact with any other views in the layout. In the side by side step, y'all add behavior to your layout to find and update other views.
Update the Count button so that when it is pressed, the number on the screen increases past 1.
- In the
fragment_first.xmllayout file, observe theidfor theTextView:
<TextView android:id="@+id/textview_first" - In
FirstFragment.kt, add a click listener for thecount_buttonbeneath the other click listeners inonViewCreated(). Because it has a little more work to do, have it call a new method,countMe().
view.findViewById<Button>(R.id.count_button).setOnClickListener { countMe(view) } - In the
FirstFragmentclass, add together the methodcountMe(),which takes a singleViewargument. This method is invoked when the Count button is clicked and the click listener chosen.
private fun countMe(view: View) { } - Use the
findViewById()method to become theTextViewthat shows the count. This method returns aView, so you must cast the result to aTextView. Specify theidof the view to get,textview_first.
... // Get the text view val showCountTextView = view.findViewById<TextView>(R.id.textview_first) - Get the value of the
showCountTextView.
... // Go the value of the text view. val countString = showCountTextView.text.toString() - Convert the value to a number, and increment information technology.
... // Convert value to a number and increment it var count = countString.toInt() count++ - Brandish the new value in the
TextViewby programmatically setting thetextproperty of theTextView.
... // Display the new value in the text view. showCountTextView.text = count.toString() Here is the whole method:
individual fun countMe(view: View) { // Get the text view val showCountTextView = view.findViewById<TextView>(R.id.textview_first) // Go the value of the text view. val countString = showCountTextView.text.toString() // Catechumen value to a number and increase it var count = countString.toInt() count++ // Display the new value in the text view. showCountTextView.text = count.toString() } - Run your app. Press the Count button and watch the count update.

nine. Chore: Implement the 2nd fragment
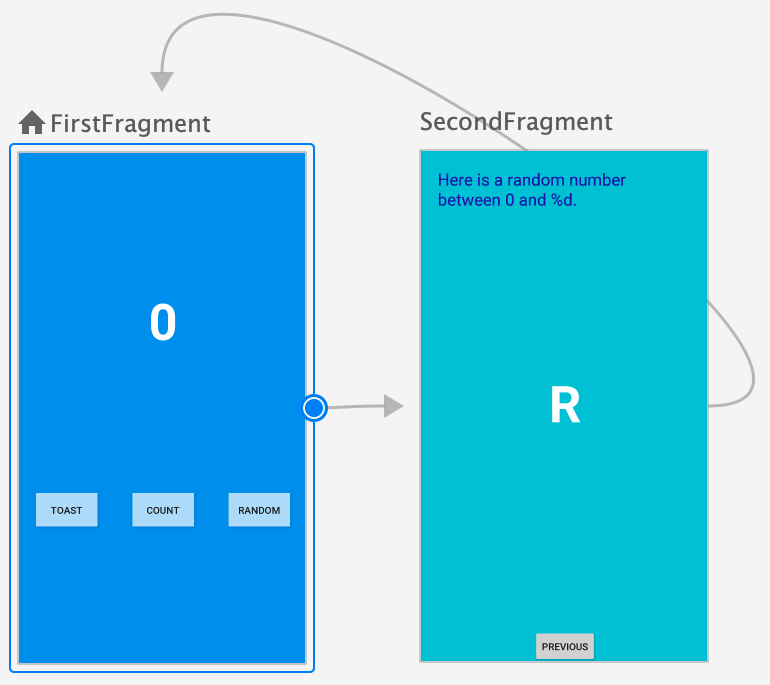
And so far, yous've focused on the starting time screen of your app. Next, you will update the Random button to display a random number between 0 and the current count on a 2d screen.
What yous'll learn
- How to laissez passer information to a 2d fragment.
Update the layout for the second fragment
The screen for the new fragment will display a heading championship and the random number. Here is what the screen will wait similar in the design view:  The %d indicates that part of the string will be replaced with a number. The R is just a placeholder.
Pace i: Add together a TextView for the random number
- Open up
fragment_second.xml(app > res > layout > fragment_second.xml) and switch to Blueprint view if needed. Notice that it has aConstraintLayoutthat contains aTextViewand aButton. - Remove the chain constraint between the
TextViewand thePush button.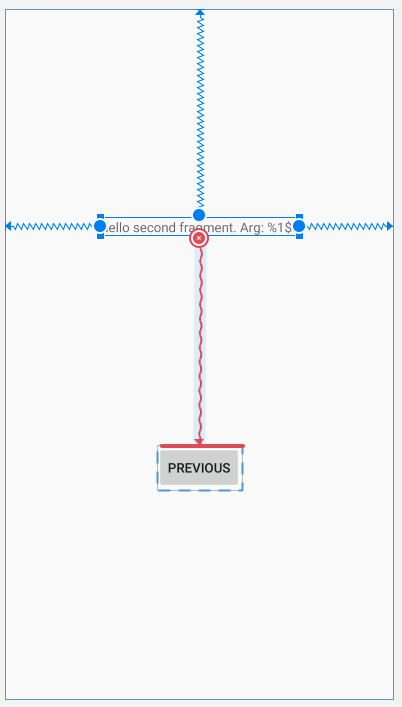
- Add another
TextViewfrom the palette and drop it almost the middle of the screen. ThisTextViewwill be used to display a random number between 0 and the current count from the starting timeFragment. - Prepare the
idto@+id/textview_random(textview_randomin the Attributes panel.) - Constrain the summit edge of the new
TextViewto the bottom of the firstTextView, the left border to the left of the screen, and the right border to the correct of the screen, and the lesser to the meridian of the Previous push. - Ready both width and height to wrap_content.
- Prepare the textColor to @android:colour/white, set the textSize to 72sp, and the textStyle to bold.
- Gear up the text to "
R". This text is just a placeholder until the random number is generated. - Gear up the layout_constraintVertical_bias to 0.45.
This TextView is constrained on all edges, so information technology's better to utilise a vertical bias than margins to accommodate the vertical position, to help the layout look good on dissimilar screen sizes and orientations.
Hither is the XML code for the TextView that displays the random number:
<TextView android:id="@+id/textview_random" android:layout_width="wrap_content" android:layout_height="wrap_content" android:text="R" android:textColor="@android:colour/white" android:textSize="72sp" android:textStyle="bold" app:layout_constraintBottom_toTopOf="@+id/button_second" app:layout_constraintEnd_toEndOf="parent" app:layout_constraintStart_toStartOf="parent" app:layout_constraintTop_toBottomOf="@+id/textview_second" app:layout_constraintVertical_bias="0.45" /> - In
fragment_second.xml, selecttextview_second, which currently has the text"Hi 2d fragment. Arg: %1$s"in thehello_second_fragmentstring resources. - If
android:textisn't set, ready it to thehello_second_fragmentstring resource.
android:text="@string/hello_second_fragment" - Change the
idtotextview_headerin the Attributes panel. - Set the width to match_constraint, only set up the height to wrap_content, so the superlative will modify equally needed to match the height of the content.
- Set height, left and correct margins to
24dp. Left and right margins may likewise exist referred to every bit "start" and "end" to back up localization for right to left languages. - Remove whatsoever lesser constraint.
- Set the text color to
@color/colorPrimaryDarkand the text size to24sp. - In
strings.xml, changehello_second_fragmentto "Here is a random number between 0 and %d." - Use Refactor > Rename... to alter the name of
hello_second_fragmenttorandom_heading.
Here is the XML code for the TextView that displays the heading:
<TextView android:id="@+id/textview_header" android:layout_width="0dp" android:layout_height="wrap_content" android:layout_marginStart="24dp" android:layout_marginLeft="24dp" android:layout_marginTop="24dp" android:layout_marginEnd="24dp" android:layout_marginRight="24dp" android:text="@string/random_heading" android:textColor="@color/colorPrimaryDark" android:textSize="24sp" app:layout_constraintEnd_toEndOf="parent" app:layout_constraintStart_toStartOf="parent" app:layout_constraintTop_toTopOf="parent" /> 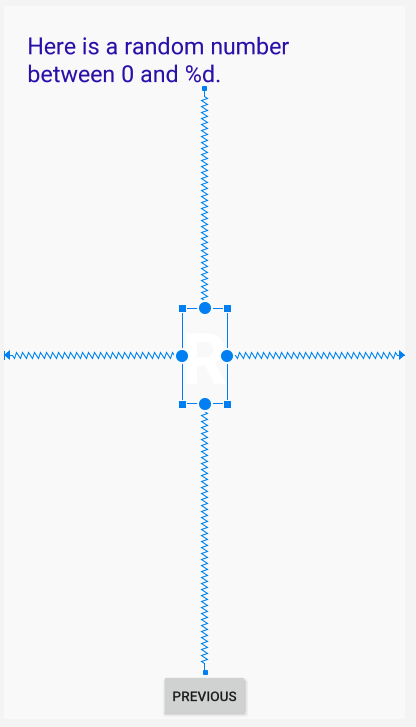
Footstep three: Change the background color of the layout
Give your new activity a unlike groundwork color than the get-go activity:
- In
colors.xml, add a new color resource:
<color proper noun="screenBackground2">#26C6DA</colour> - In the layout for the second action,
fragment_second.xml, set the groundwork of theConstraintLayoutto the new colour.
In the Attributes panel:
Or in XML:
android:groundwork="@colour/screenBackground2" Your app now has a completed layout for the 2nd fragment. But if yous run your app and press the Random push, it may crash. The click handler that Android Studio set up up for that button needs some changes. In the side by side chore, you volition explore and gear up this error.
Step four: Examine the navigation graph
When y'all created your project, you lot chose Bones Action as the template for the new project. When Android Studio uses the Basic Activity template for a new project, it sets up 2 fragments, and a navigation graph to connect the two. It besides sets upwardly a button to go from the get-go fragment to the second. This is the button you changed into the Random push. And now y'all desire to transport a number when the button is pressed.
- Open
nav_graph.xml(app > res > navigation > nav_graph.xml).
A screen similar to the Layout Editor in Design view appears. It shows the two fragments with some arrows betwixt them. Yous can zoom with + and - buttons in the lower correct, as you did with the Layout Editor.
- You can freely move the elements in the navigation graph. For example, If the fragments announced with
SecondFragmentto the left, dragFirstFragmentto the left ofSecondFragmentso they appear in the order you work with them.
Step five: Enable SafeArgs
This will enable SafeArgs in Android Studio.
- Open Gradle Scripts > build.gradle (Project: My Start App)
- Find the
dependenciessection In thebuildscriptsection, and add the following lines later the otherclasspathentries:
def nav_version = "2.three.0-alpha02" classpath "androidx.navigation:navigation-condom-args-gradle-plugin:$nav_version" - Open up Gradle Scripts > build.gradle (Module: app)
- Merely below the other lines that begin with apply plugin add a line to enable SafeArgs:
apply plugin: 'androidx.navigation.safeargs.kotlin' - Android Studio should display a bulletin about the Gradle files beingness changed. Click Sync Now on the right hand side.

Subsequently a few moments, Android Studio should brandish a message in the Sync tab that information technology was successful: 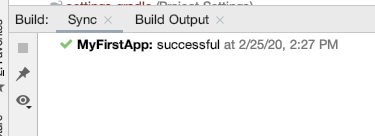
- Cull Build > Make Project. This should rebuild everything so that Android Studio can observe
FirstFragmentDirections.
Footstep 6: Create the statement for the navigation action
- In the navigation graph, click on
FirstFragment, and expect at the Attributes panel to the right. (If the console isn't showing, click on the vertical Attributes characterization to the right.) - In the Actions section, information technology shows what activity will happen for navigation, namely going to
SecondFragment. - Click on
SecondFragment, and look at the Attributes panel.
The Arguments section shows aught.
- Click on the + in the Arguments section.
- In the Add Argument dialog, enter
myArgfor the proper noun and ready the type to Integer, then click the Add push button.
Step 6: Ship the count to the 2d fragment
The Next/Random button was gear up upward by Android Studio to get from the first fragment to the second, but it doesn't send whatever information. In this step you'll modify it to send a number for the electric current count. You volition get the current count from the text view that displays it, and pass that to the second fragment.
- Open
FirstFragment.kt(app > coffee > com.example.myfirstapp > FirstFragment) - Find the method
onViewCreated()and notice the code that sets up the click listener to go from the beginning fragment to the second. - Supercede the code in that click listener with a line to find the count text view,
textview_first.
val showCountTextView = view.findViewById<TextView>(R.id.textview_first) - Get the text of the view and convert information technology to an
Int.
val currentCount = showCountTextView.text.toString().toInt() - Create an action with
currentCountas the argument toactionFirstFragmentToSecondFragment().
val activeness = FirstFragmentDirections.actionFirstFragmentToSecondFragment(currentCount) - Add a line to detect the nav controller and navigate with the action you created.
findNavController().navigate(activity) Here is the whole method, including the code you added earlier:
override fun onViewCreated(view: View, savedInstanceState: Package?) { super.onViewCreated(view, savedInstanceState) view.findViewById<Button>(R.id.random_button).setOnClickListener { val showCountTextView = view.findViewById<TextView>(R.id.textview_first) val currentCount = showCountTextView.text.toString().toInt() val action = FirstFragmentDirections.actionFirstFragmentToSecondFragment(currentCount) findNavController().navigate(action) } // find the toast_button by its ID view.findViewById<Push button>(R.id.toast_button).setOnClickListener { // create a Toast with some text, to appear for a short time val myToast = Toast.makeText(context, "Hello Toast!", Toast.LENGTH_SHORT) // show the Toast myToast.show() } view.findViewById<Button>(R.id.count_button).setOnClickListener { countMe(view) } } - Run your app. Click the Count button a few times. Now when you press the Random button, the second screen shows the correct string in the header, just notwithstanding no count or random number, because you need to write some code to do that.
Step seven: Update SecondFragment to compute and display a random number
You take written the code to transport the electric current count to the second fragment. The next step is to add together code to SecondFragment.kt to retrieve and employ the current count.
- In
SecondFragment.kt, add an import for navArgs to the list of imported libraries.
import androidx.navigation.fragment.navArgs - In
SecondFragment.kt, beforeonViewCreated(), add a line to define where the arguments are.
val args: SecondFragmentArgs by navArgs() - In
SecondFragment.ktbelow where the click listener is created, add lines to get the count argument, get the string and format it with the count, and and so set it fortextview_header.
val count = args.myArg val countText = getString(R.string.random_heading, count) view.findViewById<TextView>(R.id.textview_header).text = countText - Add together code to get a random number betwixt 0 and the count.
val random = java.util.Random() var randomNumber = 0 if (count > 0) { randomNumber = random.nextInt(count + 1) } - Add code to convert that number into a cord and gear up it as the text for
textview_random.
view.findViewById<TextView>(R.id.textview_random).text = randomNumber.toString() Here is the whole method.
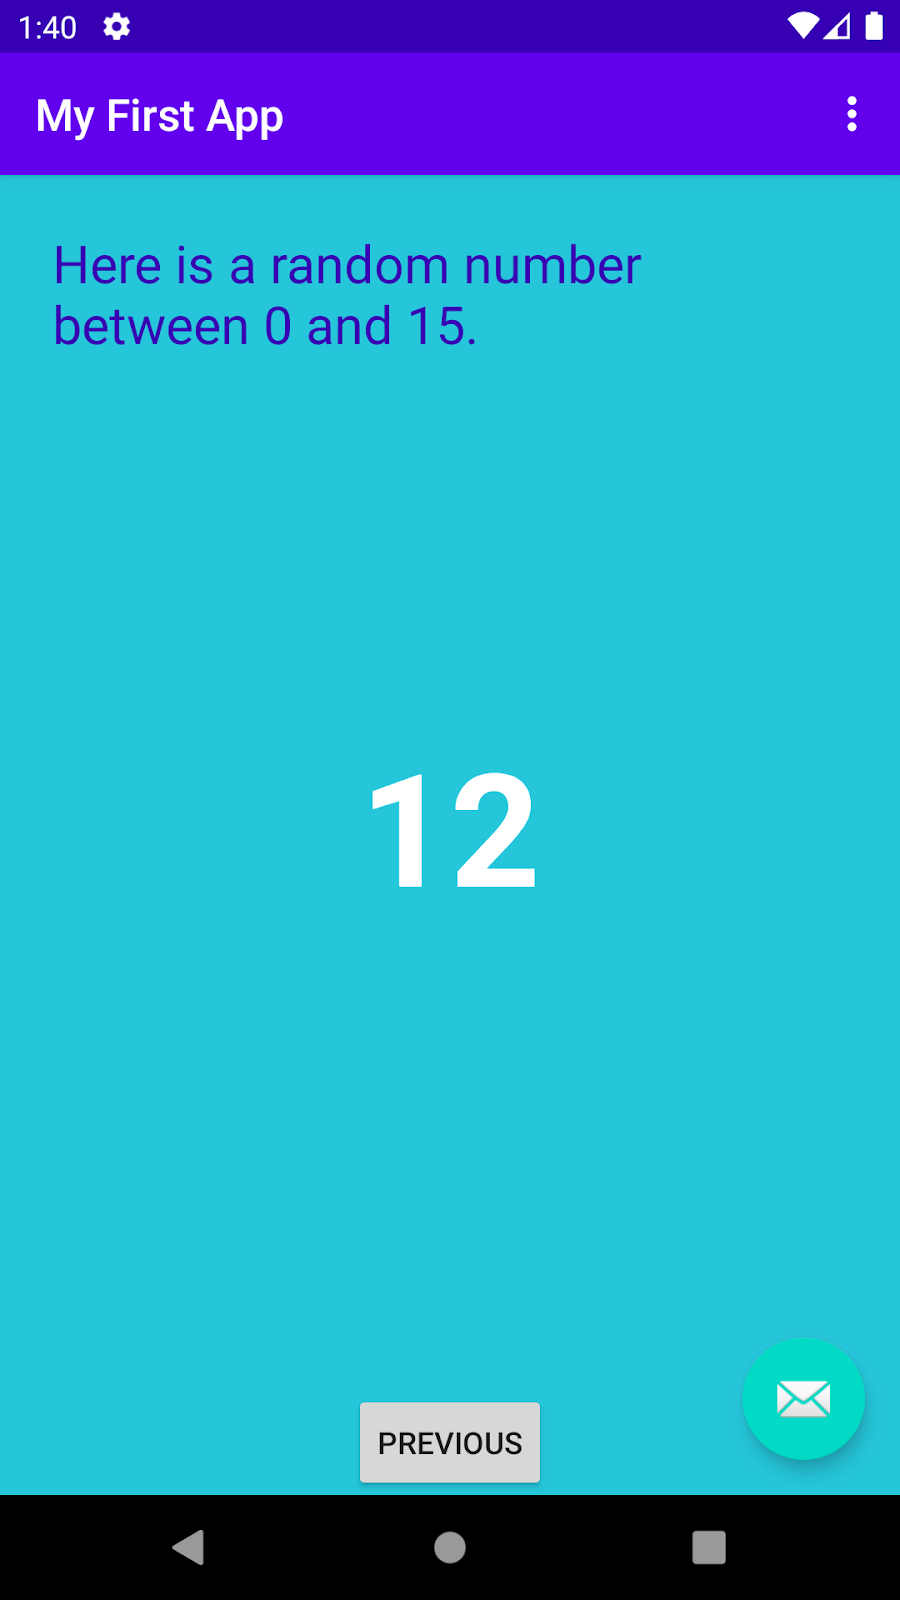
val args: SecondFragmentArgs by navArgs() override fun onViewCreated(view: View, savedInstanceState: Package?) { super.onViewCreated(view, savedInstanceState) view.findViewById<Button>(R.id.button_second).setOnClickListener { findNavController().navigate(R.id.action_SecondFragment_to_FirstFragment) } val count = args.myArg val countText = getString(R.string.random_heading, count) view.findViewById<TextView>(R.id.textview_header).text = countText val random = java.util.Random() var randomNumber = 0 if (count > 0) { randomNumber = random.nextInt(count + one) } view.findViewById<TextView>(R.id.textview_random).text = randomNumber.toString() } - Run the app. Press the Count button a few times, then press the Random push button. Does the app brandish a random number in the new activity?
Congratulations, yous have built your first Android app!
10. Learn more
The intention of this codelab was to go you started edifice Android apps. We hope you lot want to know a lot more than though, like how do I save data? How do I run background tasks? How practise I display a list of photos? How do I ...
We encourage you to keep learning. We have more Android in Kotlin courses built by Google to assistance you on your learning journey
Written tutorials
- Android Developer Fundamentals teaches programmers to build Android apps.
- Kotlin Bootcamp codelabs form is an introduction to Kotlin for programmers. You demand experience with an object oriented programming language (Java, C++, Python) to accept this form..
- Find more than at programmer.android.com, the official Android programmer documentation from Google.
Online courses
- Kotlin Bootcamp for Programmers: This is an introduction to Kotlin for programmers. You need some experience with an object oriented programming language (Coffee, C++, Python) to take this class.
These interactive, video-based courses were created by Google experts in collaboration with Udacity. Take these courses at your own pace in your own time.
- Developing Android Apps in Kotlin: If you know how to program, learn how to build Android apps. This course uses Kotlin.
Except as otherwise noted, the content of this page is licensed under the Creative Commons Attribution four.0 License, and code samples are licensed under the Apache two.0 License. For details, encounter the Google Developers Site Policies. Java is a registered trademark of Oracle and/or its affiliates.
Source: https://developer.android.com/codelabs/build-your-first-android-app-kotlin
Postar um comentário for "Your App Is Not Available Try Again Later Os X"